- Read Before Using App
- FAQ
- Encryption AES-256
- Automatic Safari Login
- Copy to New Device
- Copy to PRO App
- Sync & Backup Data
- Air Print
- Customized Category
- MacOSX version
- Other Platforms
- Troubleshoot
- Support
Instructions Before Using iPassSafe
-
Choose strong unlock code
Change your Unlock Code to a strong code with letters, numbers, signs and with a length of at least 10 chars.
-
Keep updated backup
Keep always an updated backup 'IDB' file saved on a trusted (not public) Desktop or DiskOnKey, you can use "FTP" sync options for this (read "Sync and Backup" section).
-
Remember you unlock code
Keep your iPassSafe unlock code written in a safe place, if you will forget your unlock code you will not be able to see your data.
-
Self-destruct option
Enable "Self Destruct option in 10 times" option (under "settings"), in case of loss or theft.
Frequently Asked Questions
-
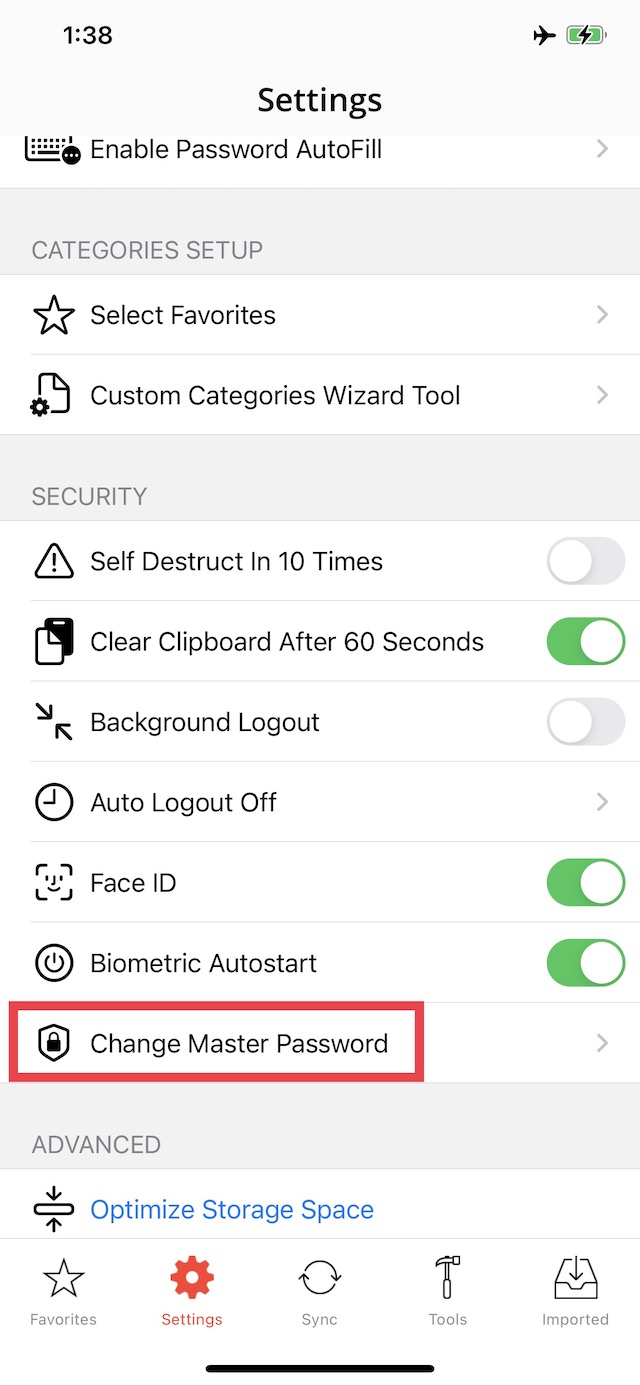
How do I change my password?
On iOS iPassSafe, tap bottom "Settings" tab, scroll down to "Security" section and tap "Change Unlock Code".
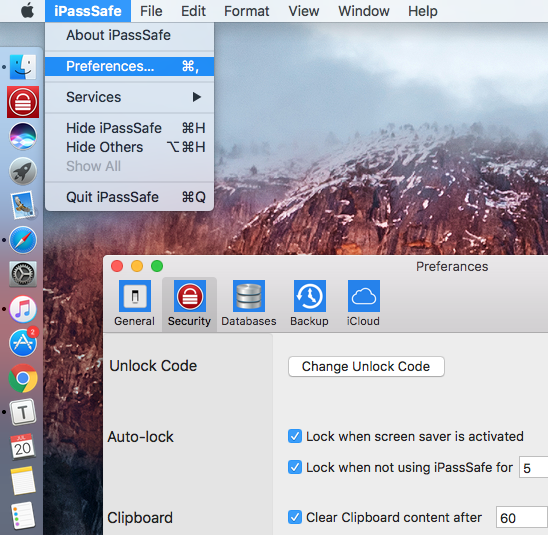
On MacOSX iPassSafe, select from Menu Bar: iPassSafe - Preferences - Security.
Note: Only After you log in, you can change your password (otherwise menu is disabled).
-
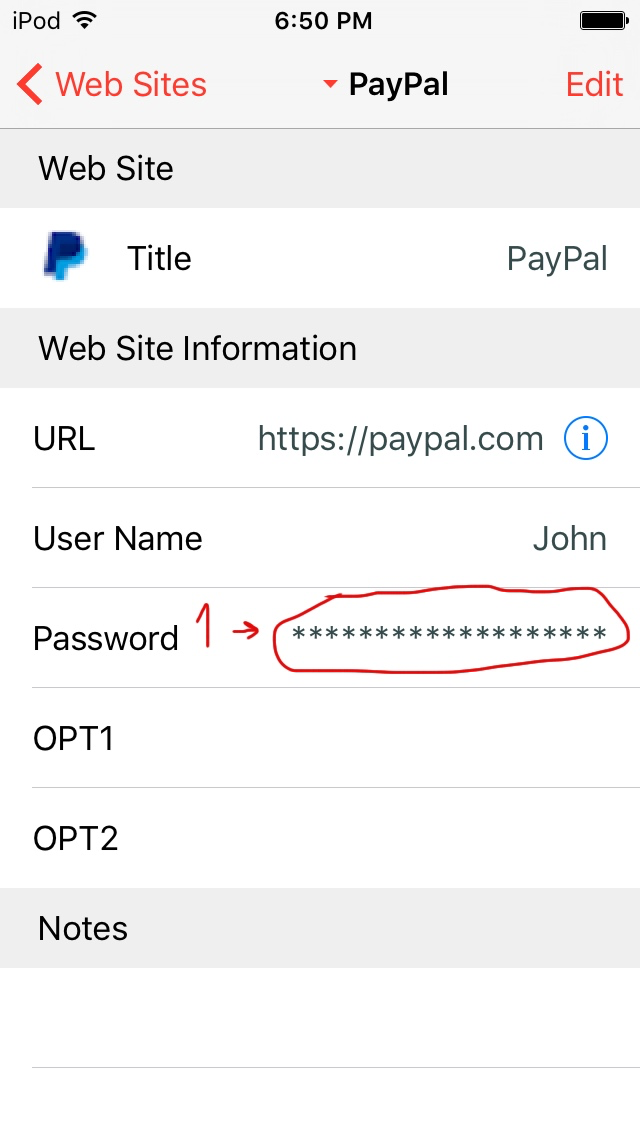
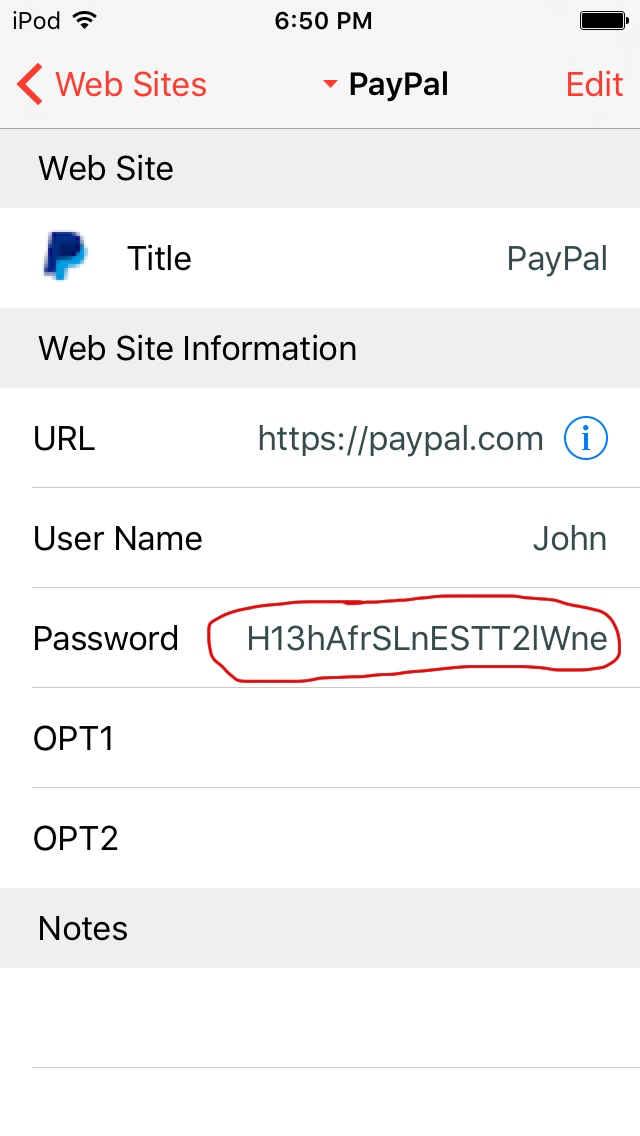
Why do I see asterisks (*) instead of the password ?
The reason is that you can copy the password and paste it (for example to safari), but still, if someone looking at your iPhone's screen he will not be able to see what is your true password (he will see ****... instead).
On iOS iPassSafe, If you want to see your password, tap the password row (1)
then tap "Reveal" (2)
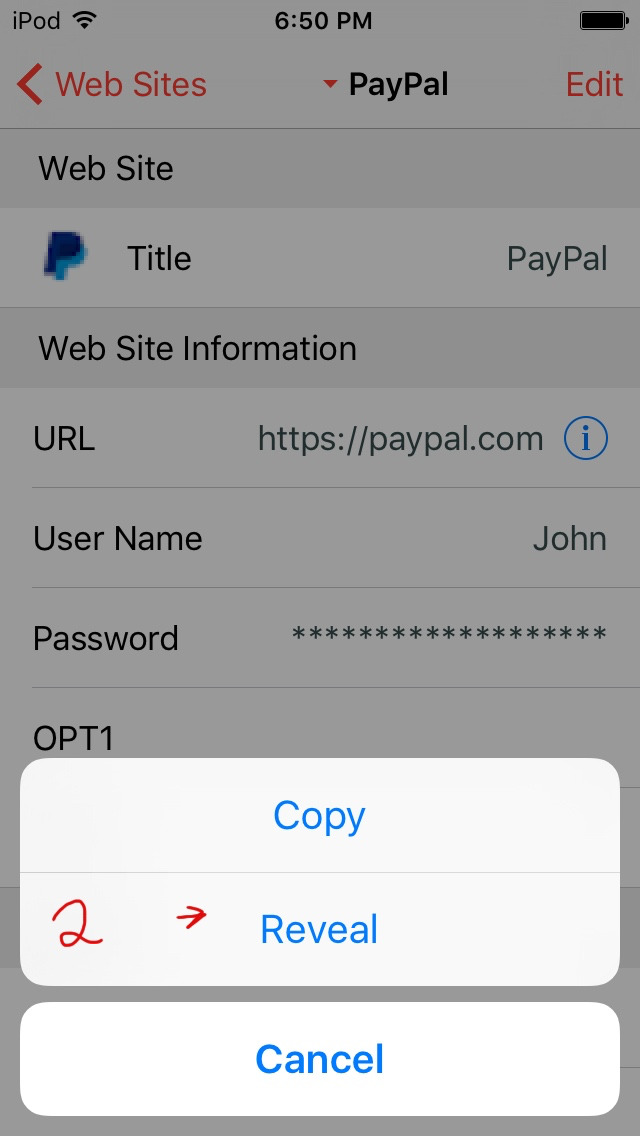
now you can see your password ...
On MacOSX iPassSafe tap the "eye" icon on the bottom right corner and reveal the password

-
How do I change the order of the rows in category ?
You can organize it as you wish, just tap right upper "Edit" and grab the 3 lines icons of the row you want up or down.
-
What if I forgot the unlock code ?
You must know your password if you want to see your data because of the encryption.
if you can not remember your unlock code, you can reset iPassSafe by deleting iPassSafe App and reinstall it back (it will be free of pay) then use 0000 as first unlock code, but ALL DATA you previously entered WILL BE LOST and you will need to type it back again. -
Is iPassSafe safe to use ?

○ iPassSafe Using Apple's iOS/OSx standard AES-256 encryption lib to automatically encrypt all your data as soon as it's stored in iPassSafe by a Master Password that only you know.
In addition, iPassSafe using PBKDF2 to better protect against encrypted keys brute force attacks.
○ AES-256 is approved by the US government for TOP SECRET data transfer.
○ All data stored on your device only! (iCloud and Dropbox are optional),
○ Auto lock timer.
○ Self destruct option after 10 tries (iOS).
○ iPassSafe is available on AppStore since 2011 (iOS) with more than 600,000 users worldwide, it delivers most comprehensive, user friendly and reliable solution to personal data security.
About Security
-
Top Security
○ iPassSafe Using Apple's iOS/OSx standard AES-256 encryption lib to automatically encrypt all your data as soon as it's stored in iPassSafe by a Master Password that only you know.
In addition, iPassSafe using PBKDF2 to better protect against encrypted keys brute force attacks.
○ AES-256 is approved by the US government for TOP SECRET data transfer.
○ All data stored on your device only! (iCloud and Dropbox are optional),
○ Auto lock timer.
○ Self destruct option after 10 tries (iOS).
○ iPassSafe is available on AppStore since 2011 (iOS) with more than 600,000 users worldwide, it delivers most comprehensive, user friendly and reliable solution to personal data security.
Safari extension
-
How can I use iPassSafe to fill login in Safari ?
Note: For MacOS instructions, please read "MacOSX version" part below
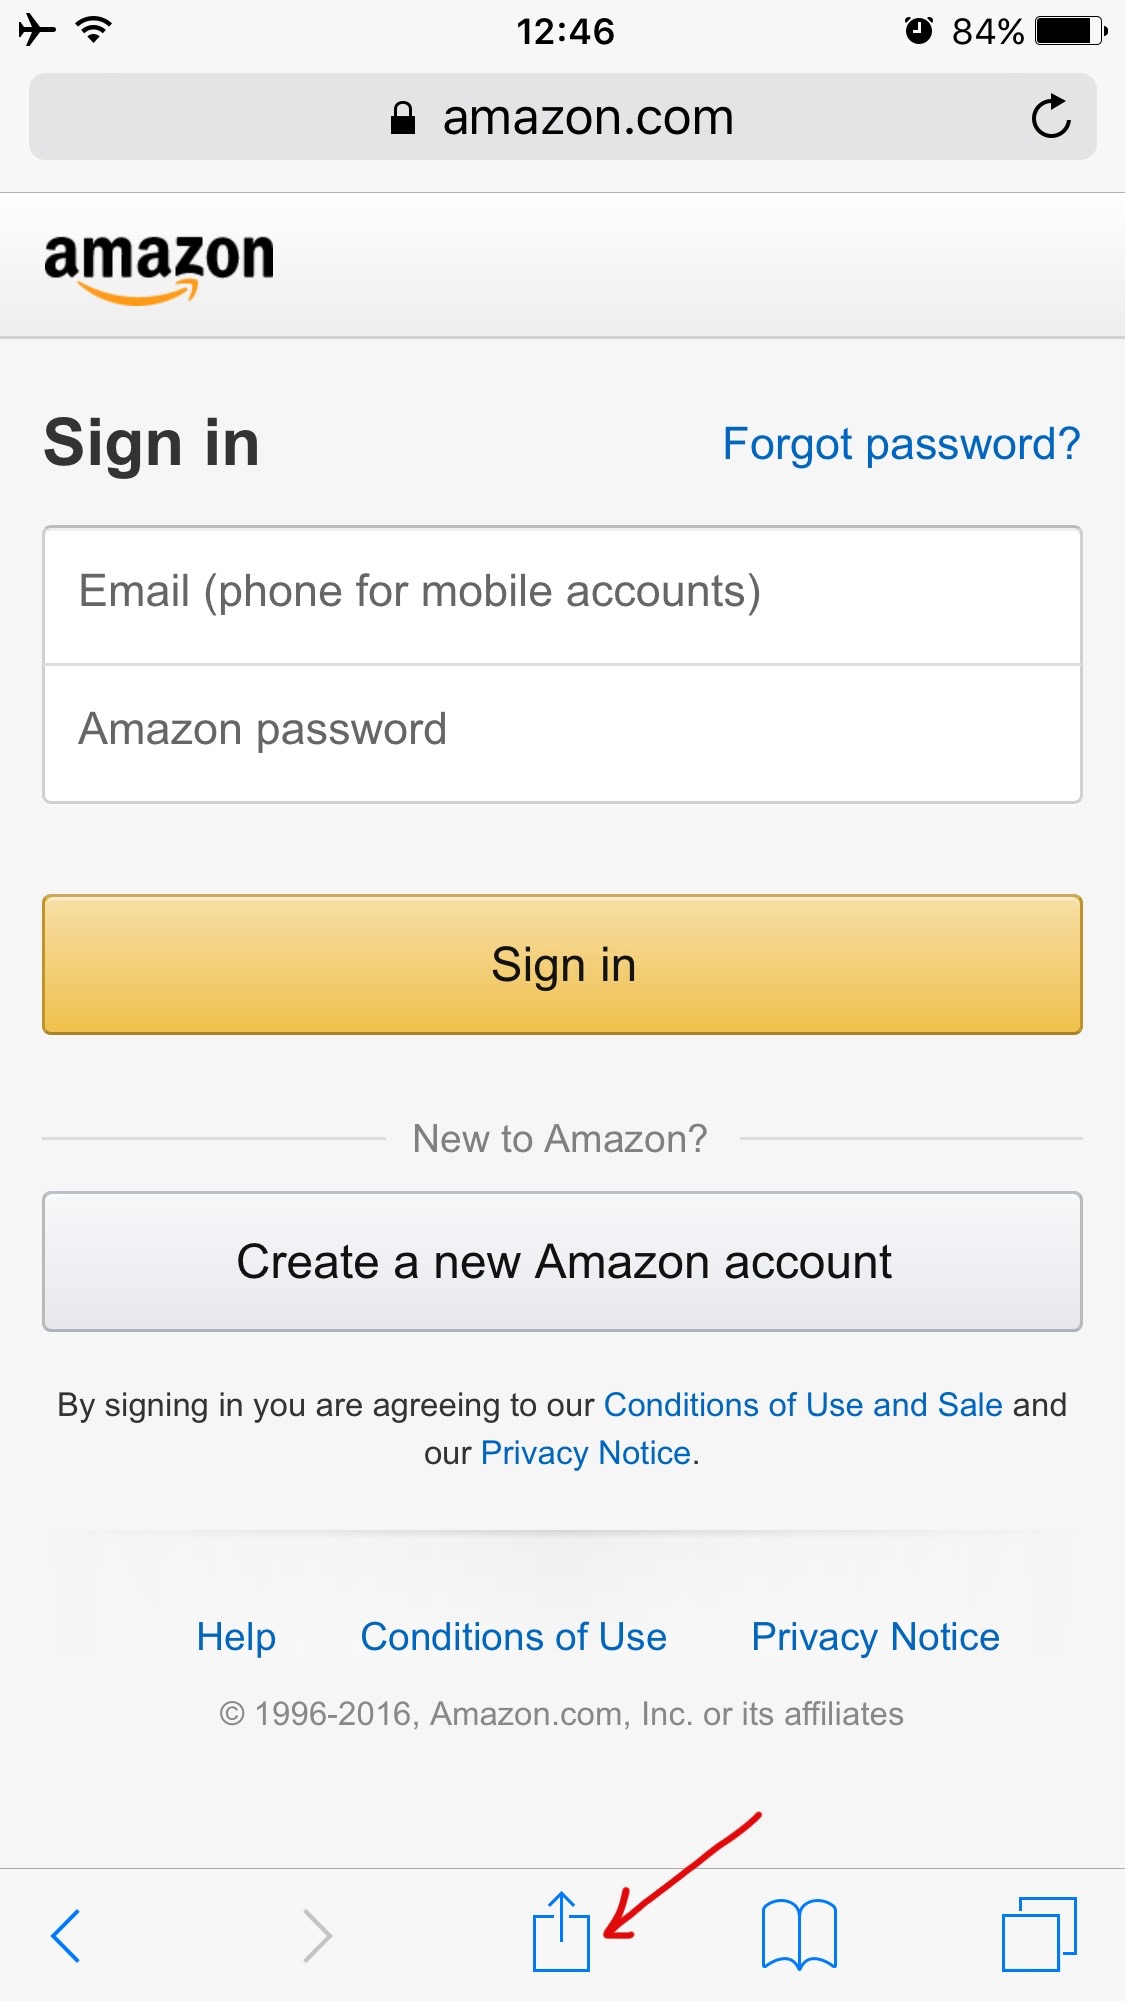
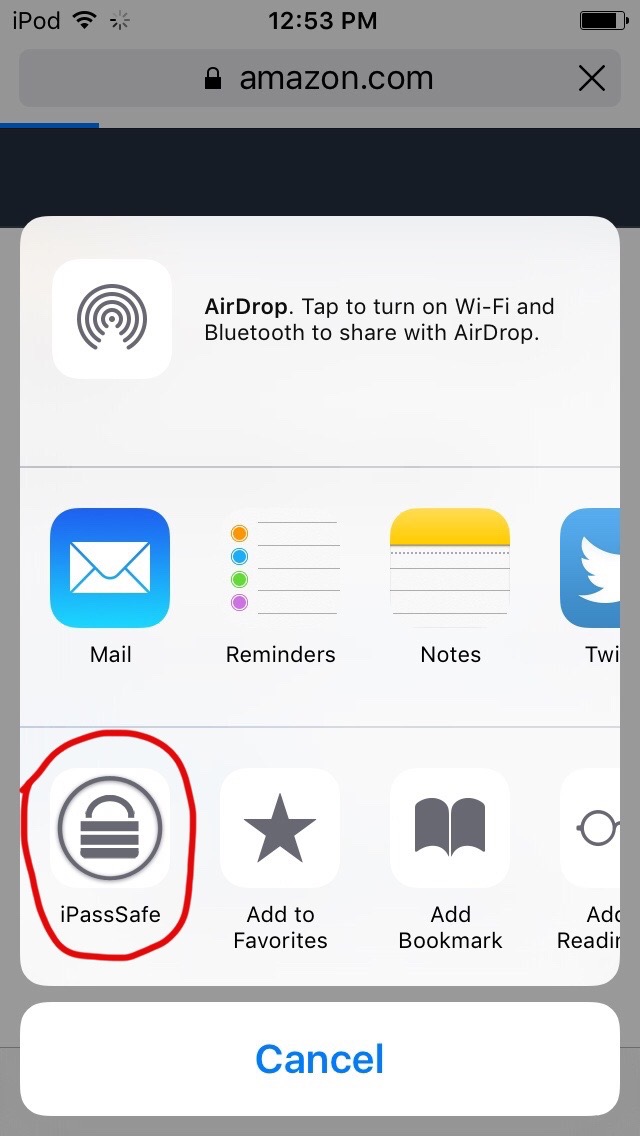
1. Launch Safari on your iPhone
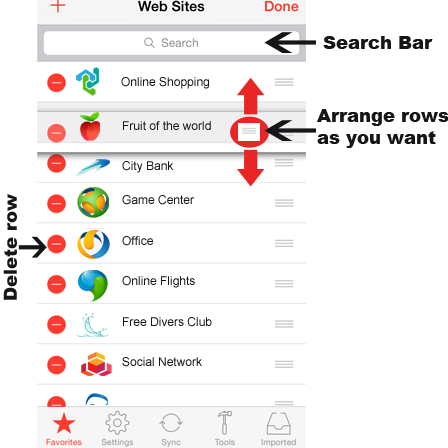
2. Tap the "Share" button in the middle of the bottom toolbar
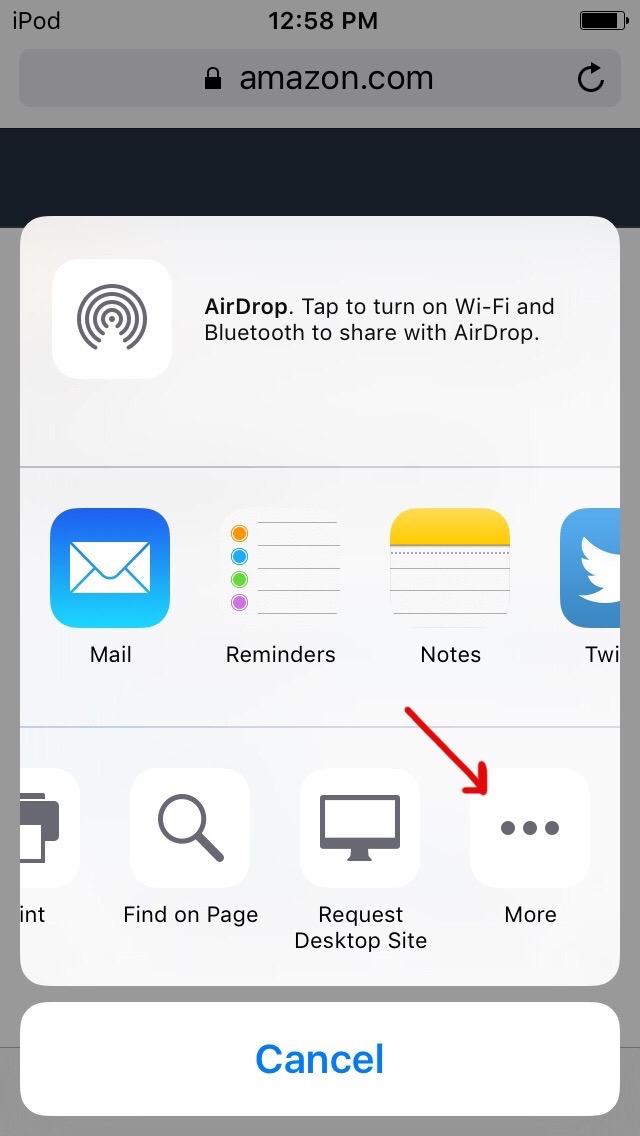
3. Slide the bottom row with the Monochrome icons (add bookmark,..) all the way to the left and tap "More" button
4. Move the switch next to iPassSafe to "ON"
5. Move the iPassSafe icon so that it's first on the share sheet
6. Tap "Done" in the upper right corner

That's it, now you can use iPassSafe to login websites.
Note: some web sites might not work with auto fill login
Copy Data to New iPhone or iPad
-
How to copy information from one iOS device to second iOS device using AirDrop ?
It's very fast & easy to do, please note that all information from the first device will replace (overwrite) the information on the second device (not merge), also you should do it using your home WiFi.
In the following example, we will show how to copy information from iPod touch to iPhone, but you can use the same example for iPhone to iPad or any iOS device to iOS device.
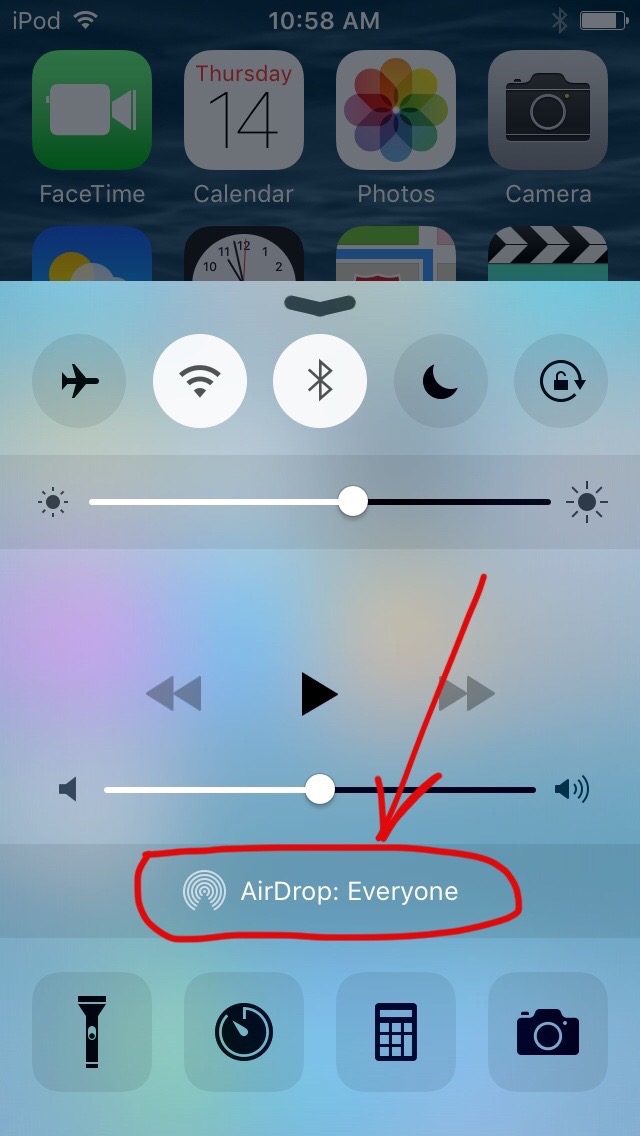
1. Enable AirDrop on both iOS devices.
Steps on the source device (in this example it's the iPod touch):
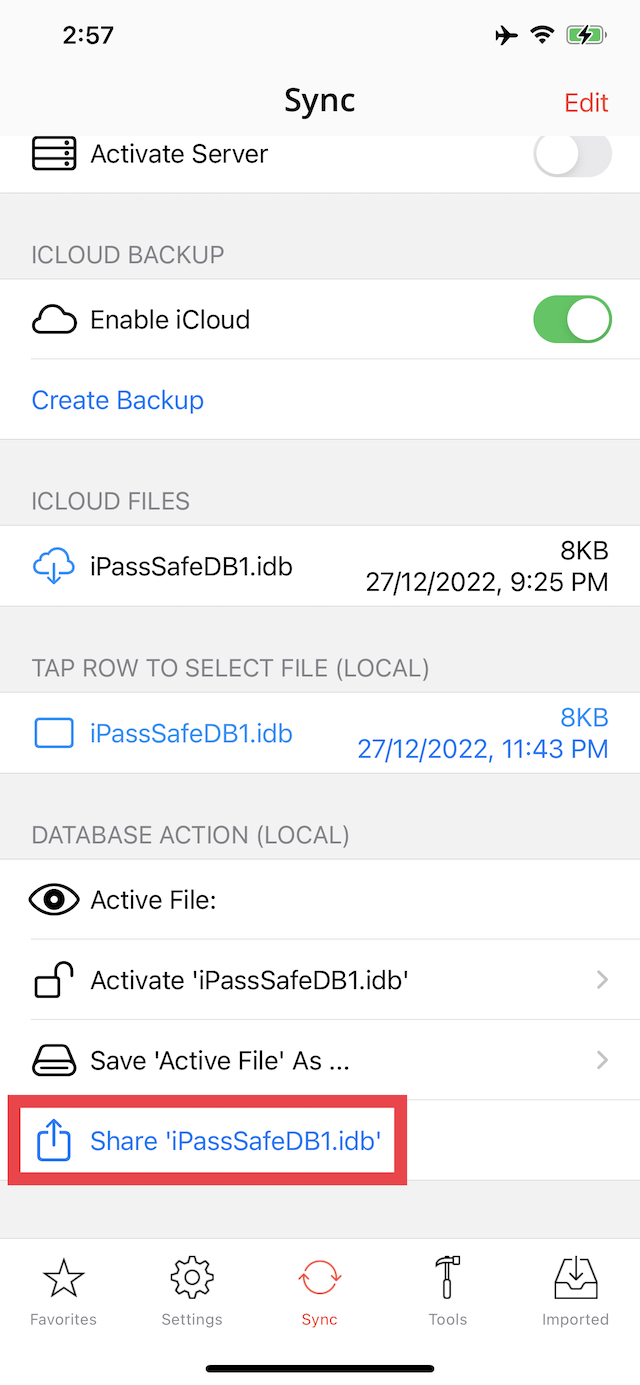
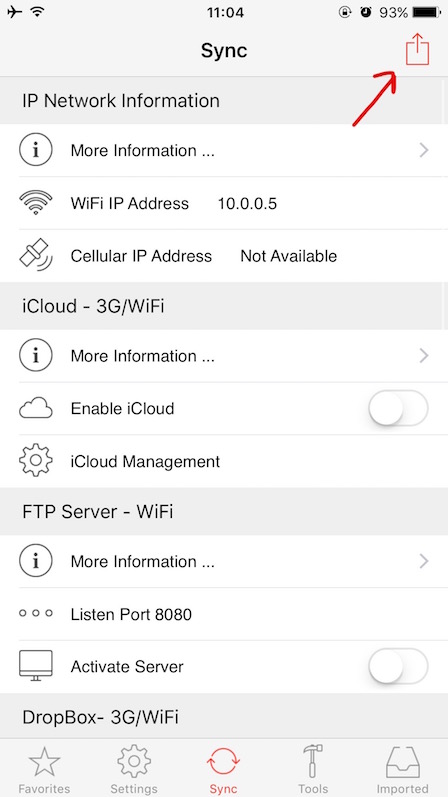
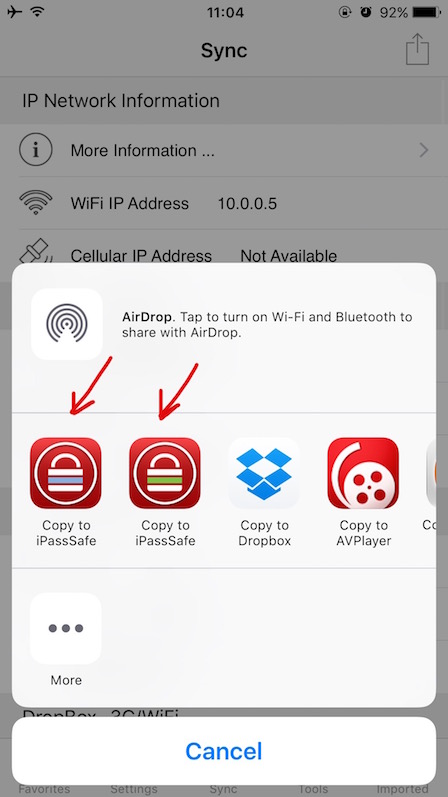
2. Using the source device iPassSafe App, the device with the data (in this example it's the iPod touch), please tap "sync" bottom tab, then tap upper right "action button"
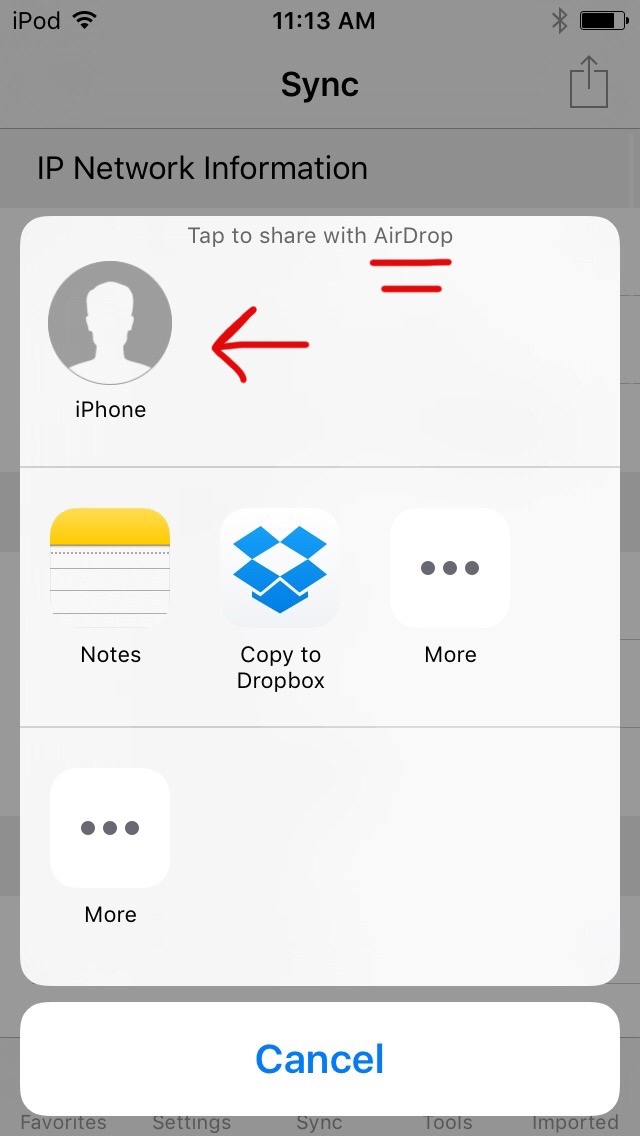
3. Select the destination device (in this example it's the iPhone) you want to copy data to, in the AirDrop section
Note: in case that the share popup is not open, please install free Dropbox app (don't need to use it, just to install).
Steps on destination device (in this example it's the iPhone):
4. unlock iPassSafe app and tap "imported" tab, then tap the row with the IDB file
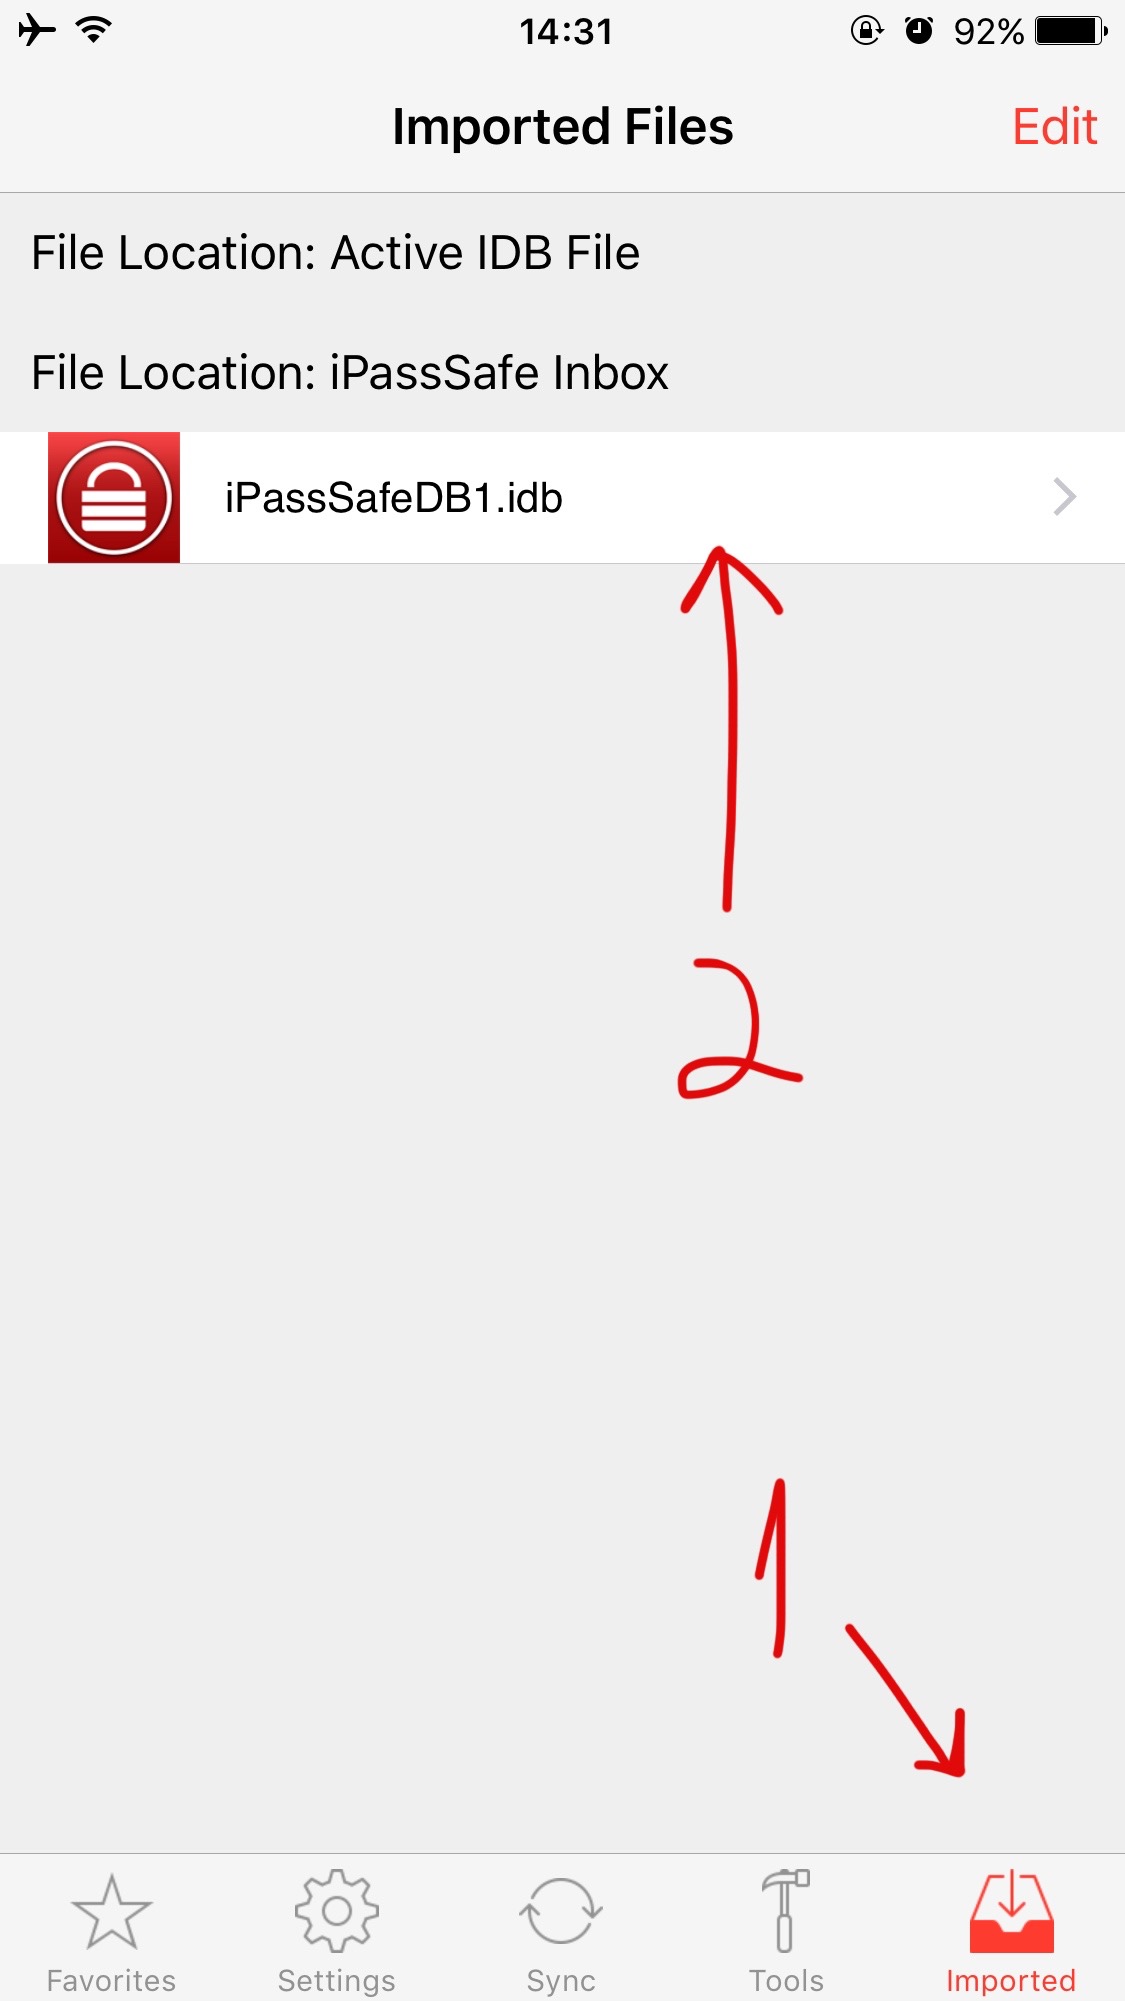
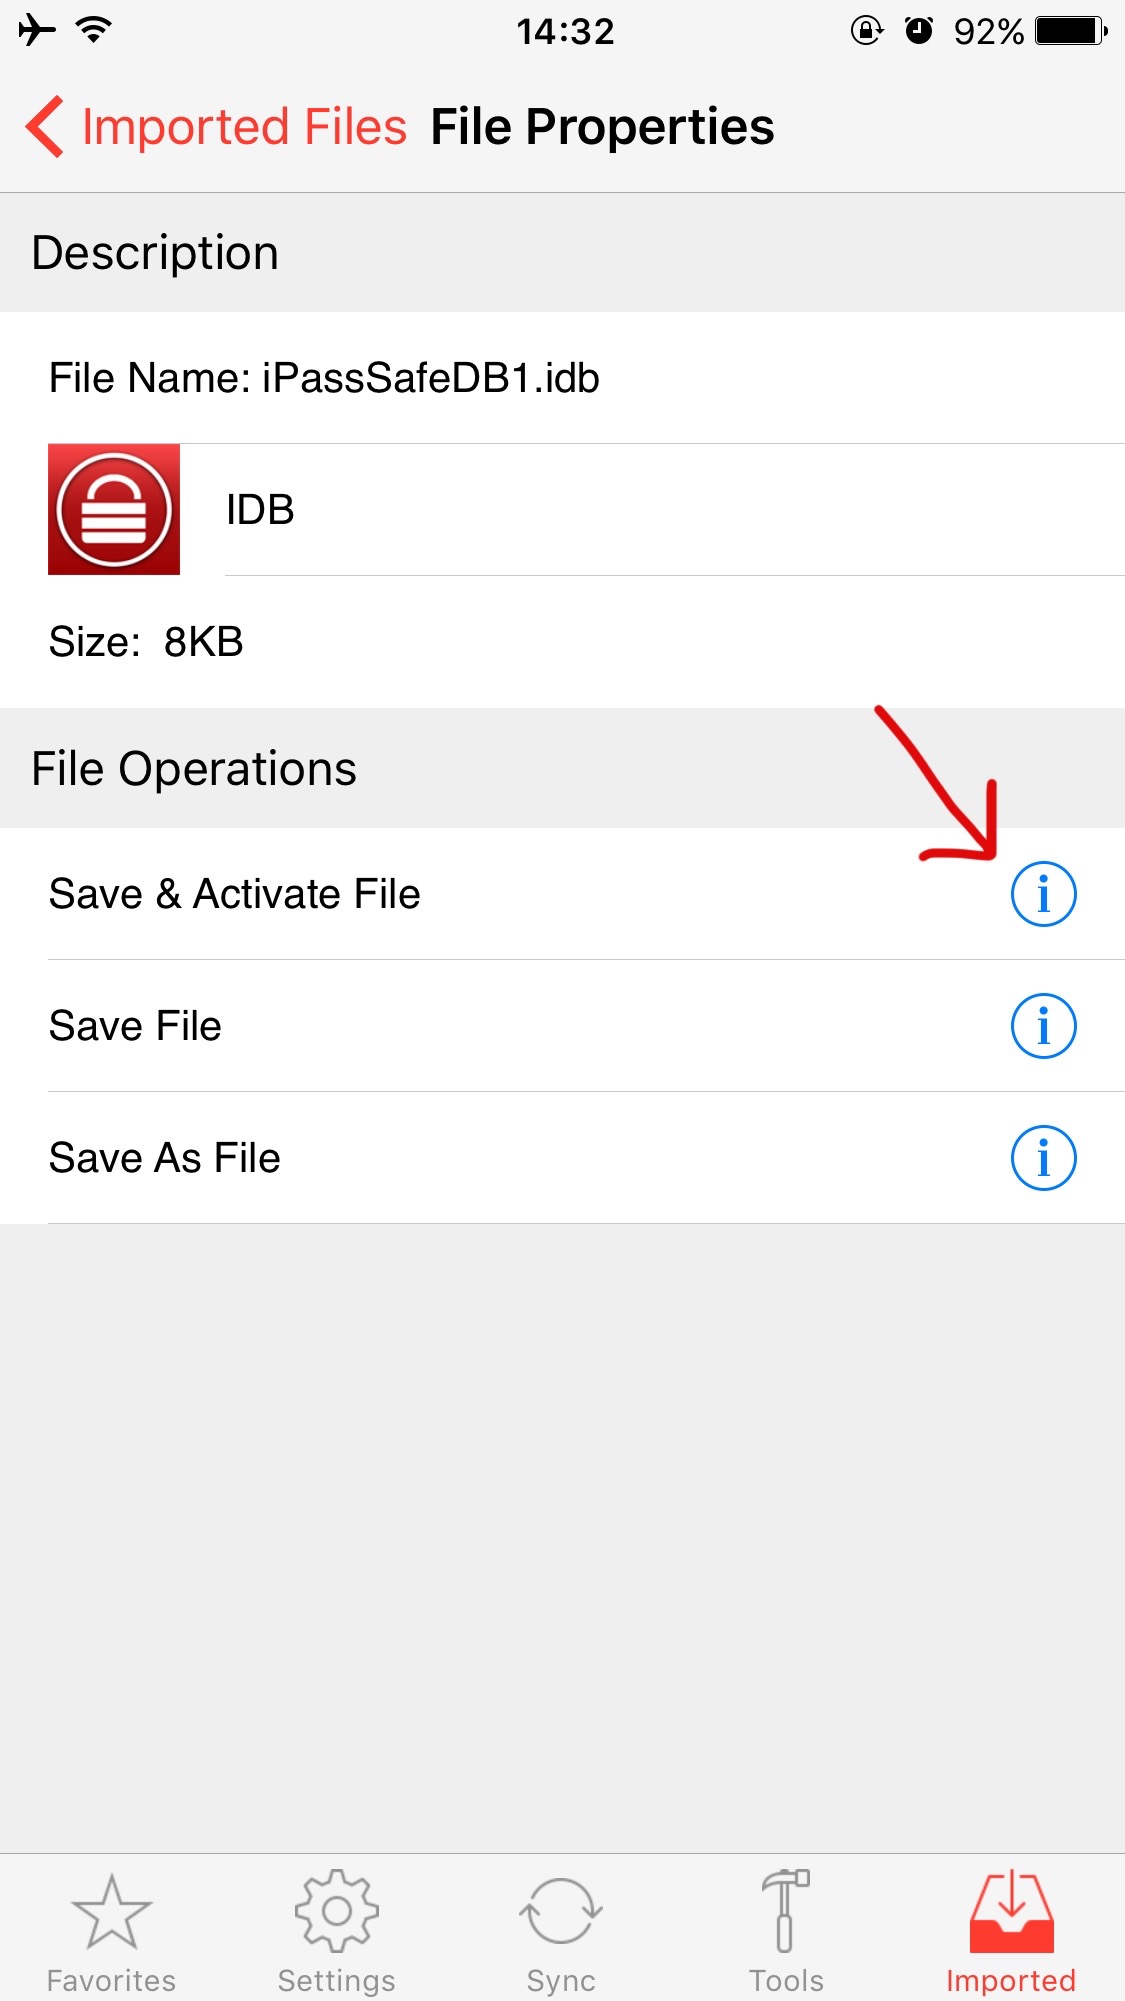
Next, tap the "i" button on the row with the text "save & activate file"
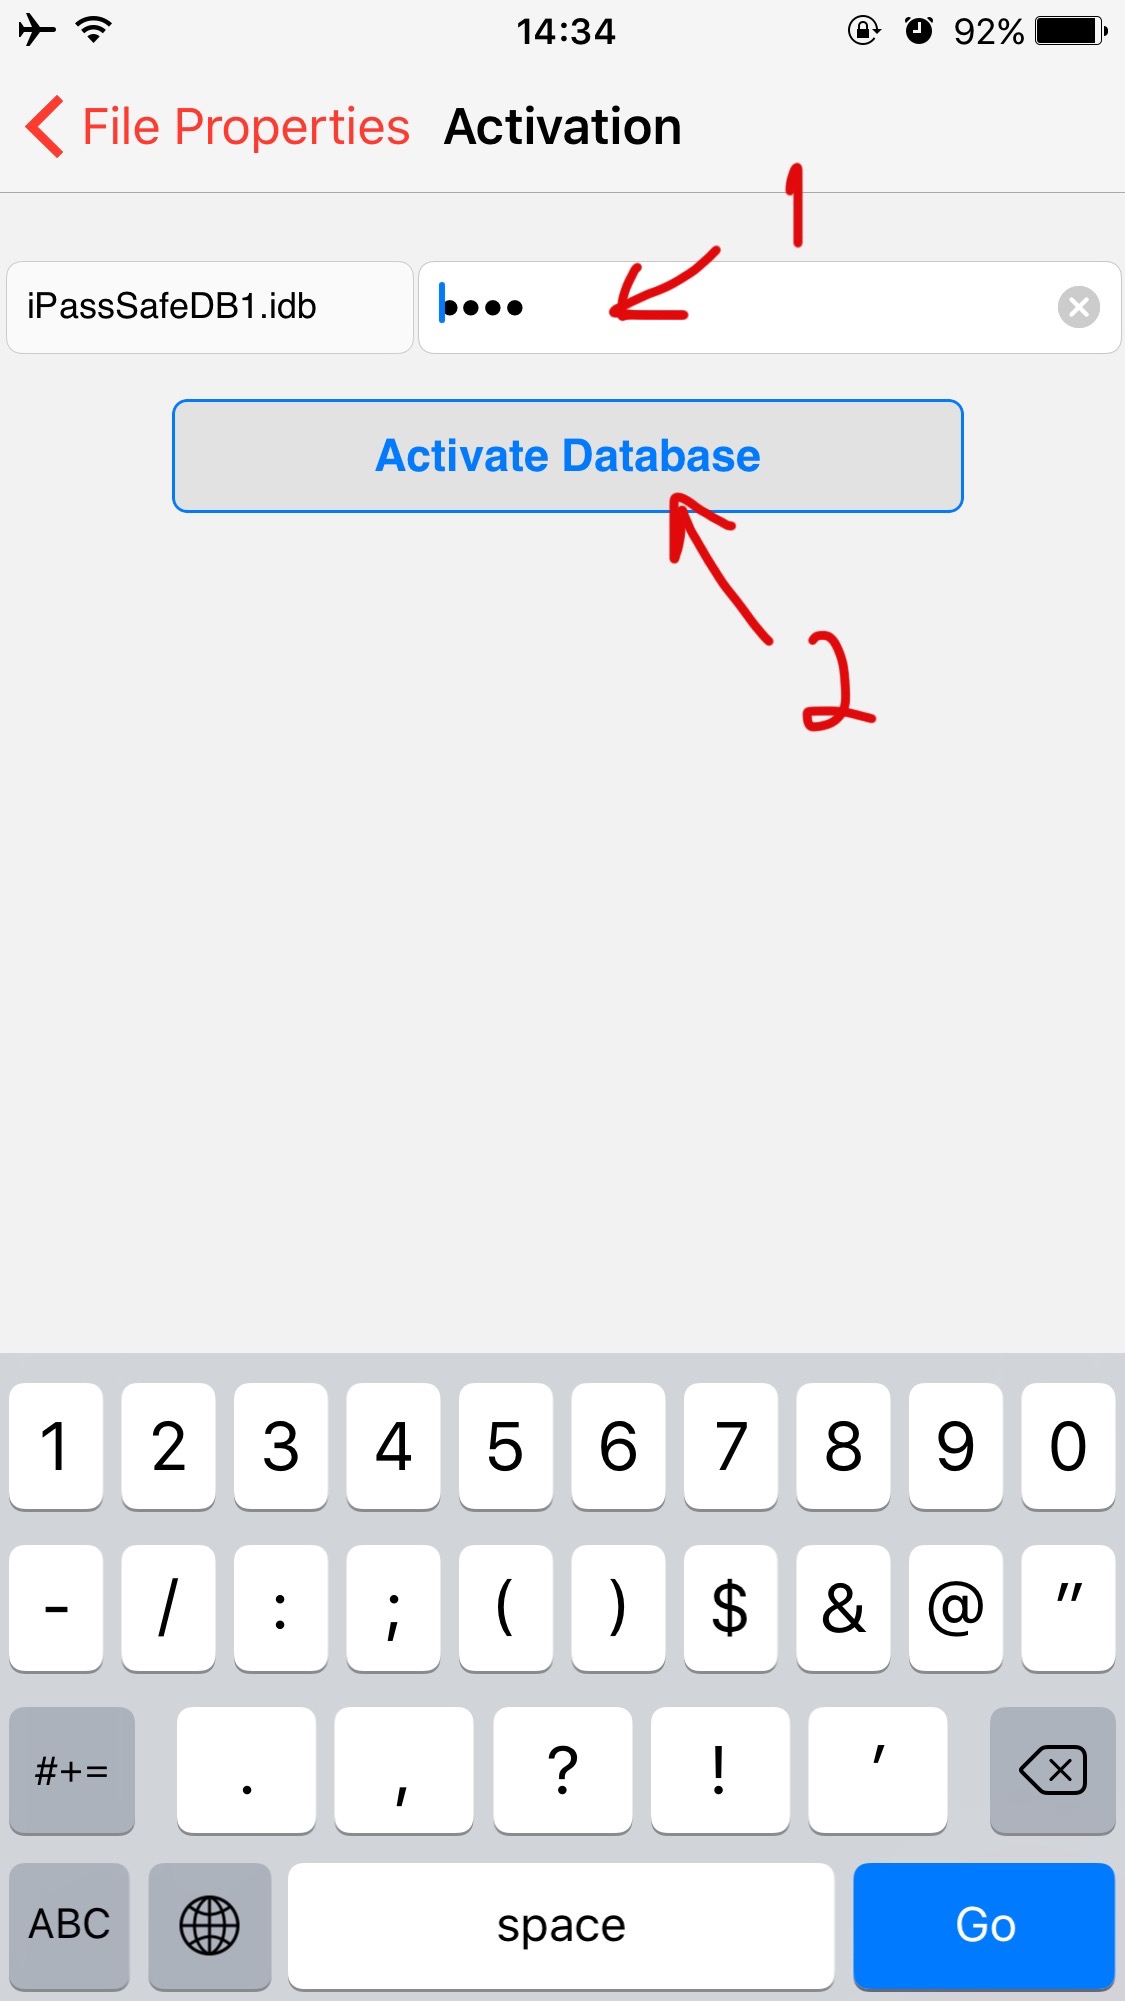
then activate the file by entering it's unlocked code (iPod touch unlock code), and tap the "Activate Database" button
That's it!
Copy Data from free/iPhone App to iPassSafe Pro (on the same device)
-
How to migrate data from free/iPhone iPassSafe app to iPassSafe Pro App ?
Before starting, please note that data on Pro app will be replaced with data of the free/iPhone app (not merge). It is usually needed when using free iPassSafe, then decide to download iPassSafe Pro but before entering data to the paid iPassSafe App.
Free/iPhone iPassSafe app steps:
1. Using Free/iPhone iPassSafe App (the app with the data), please tap "sync" bottom tab, then tap upper right "action button"
Note: in case that the share popup is not open, please install free Dropbox app (don't need to use it, just to install).
Then select the iPassSafe Pro App you want to copy data to
iPassSafe Pro app steps:
2. Use 0000 (first-time code is 0000) to unlock Paid iPassSafe app and tap "imported" tab, then tap the row with the IDB file
Next, tap the "i" button on the row with the text "save & activate file"
then activate the file by entering it's unlocked code (free app unlock code), and tap the "Activate Database" button
that's it!
SYNC and Backup
-
How to migrate data from free iPassSafe app to iPassSafe Paid App
Before starting, please note that data on the paid app will be replaced with data of the free app (not merge). It is usually needed when using free iPassSafe, then decide to download Paid iPassSafe but before entering data to the paid iPassSafe App.
Free iPassSafe app steps:
1. Using Free iPassSafe App (the app with the data), please tap "sync" bottom tab, then tap upper right "action button"
Note: in case that the share popup is not open, please install free Dropbox app (don't need to use it, just to install).
Then select the Paid iPassSafe App (iPhone, or Pro) you want to copy data to
Paid iPassSafe app steps:
2. Use 0000 (first-time code is 0000) to unlock Paid iPassSafe app and tap "imported" tab, then tap the row with the IDB file
Next, tap the "i" button on the row with the text "save & activate file"
then activate the file by entering it's unlocked code (free app unlock code), and tap the "Activate Database" button
that's it! -
How to copy IDB file from iOS device to your PC/Mac using FTP (iOS backup)
It's very important to keep an updated backup 'IDB' file saved on a trusted (not public) Desktop or DiskOnKey, the easiest way to do it is with FTP Client an application you can install free on your Mac or PC, and your home WiFi network, connected to both your PC and your iOS device.
FTP - Environment Setup
1. Home WiFi router.
2. DeskTop (PC or Mac).
3. iOS Device running iPassSafe and connected to your home WiFi network.
4. FileZilla Client Installed on your Desktop (PC or Mac) you can get free from https://filezilla-project.org/
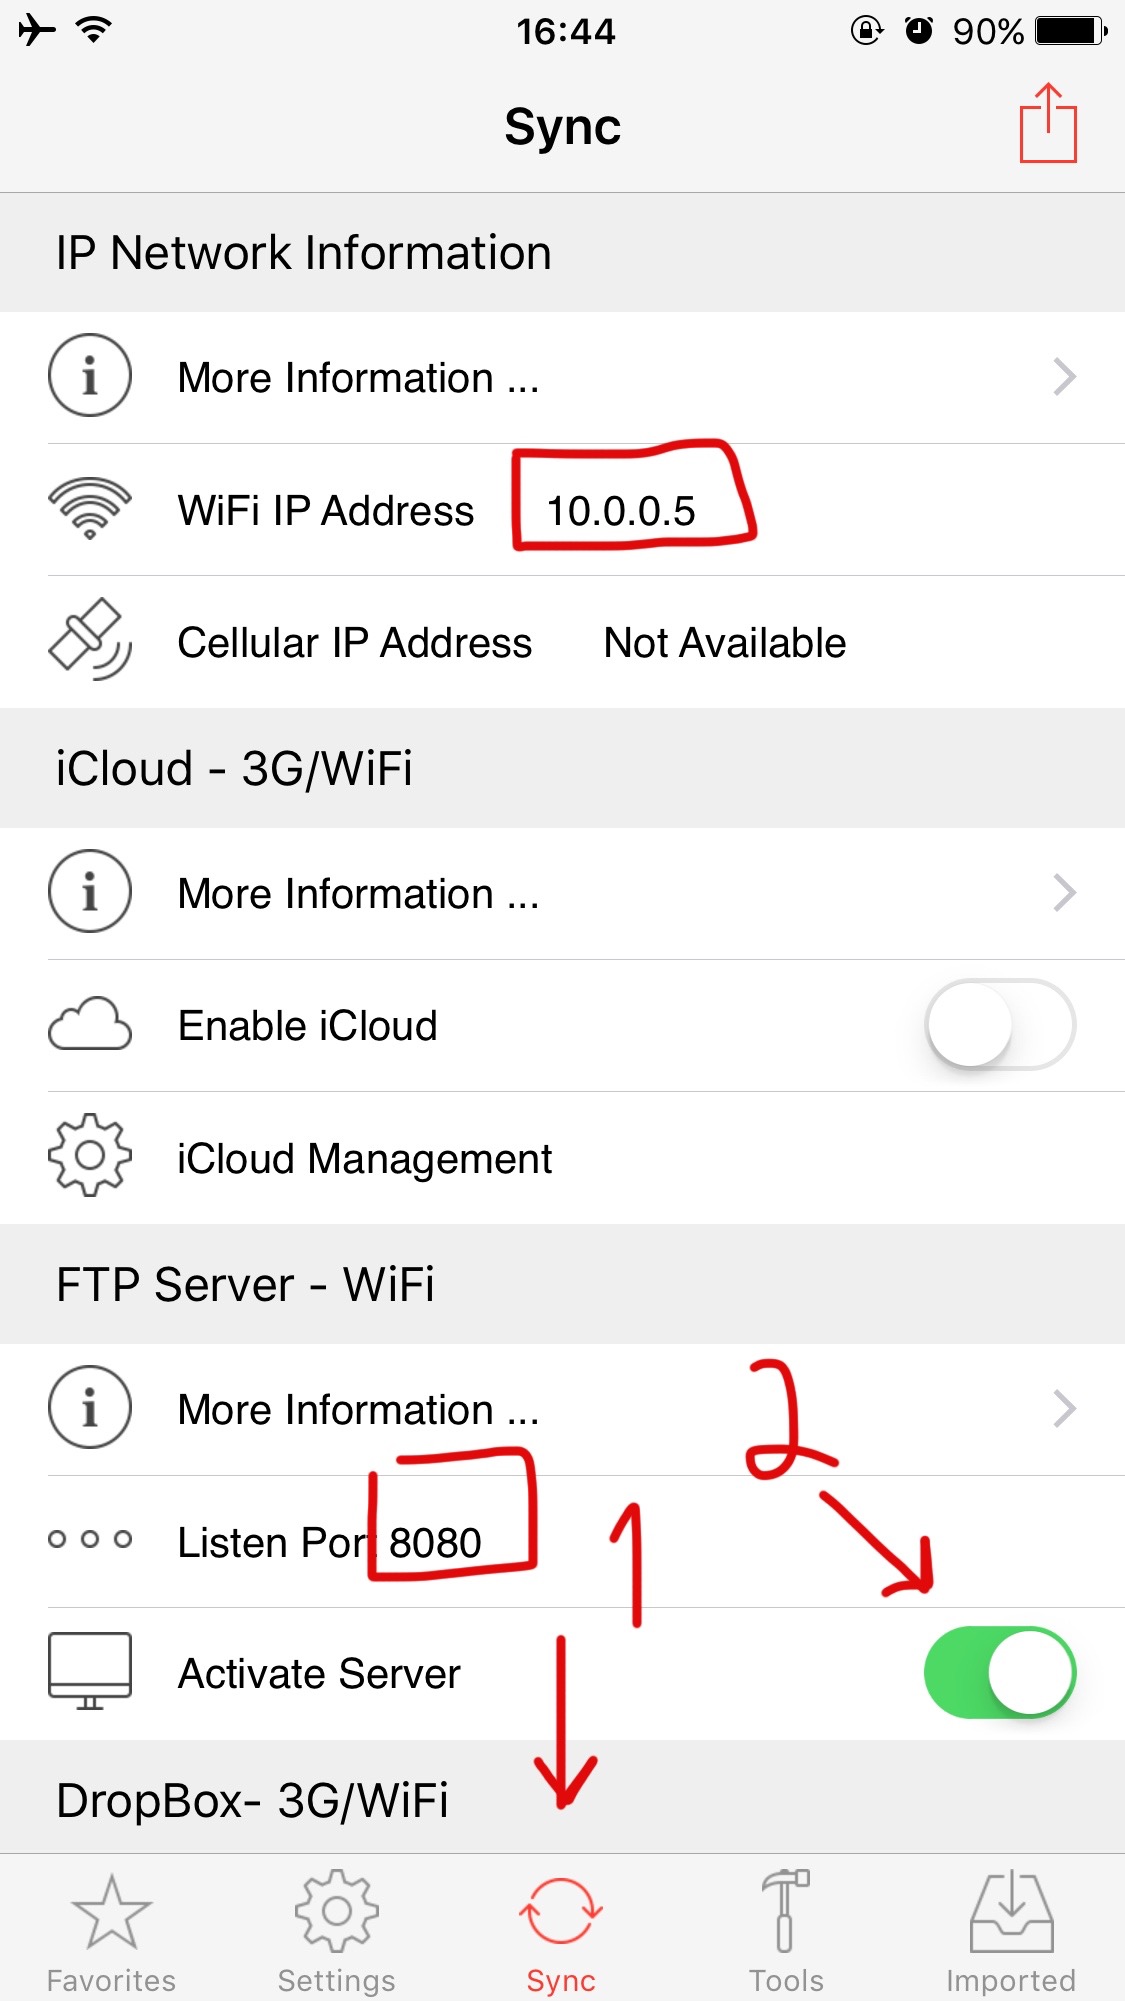
iOS (iPod.T/iPhone/iPad) Device setup
1. Connect device to WiFi network.
2. Tap "Sync" tab on iPassSafe App.
3. Move "Activate Server" switch to "ON".
copy IDB file from iOS device to your desktop (PC or Mac)
1. Start "FileZilla" on your desktop
2. Enter Host as iPassSafe/"Sync" WiFi address (in previous slide it's 10.0.0.5)
3. Enter port as 8080
4. Tap "QuickConnect"
5. copy iDB file using your desktop mouse from right side (iOS) to left side (Desktop folder)
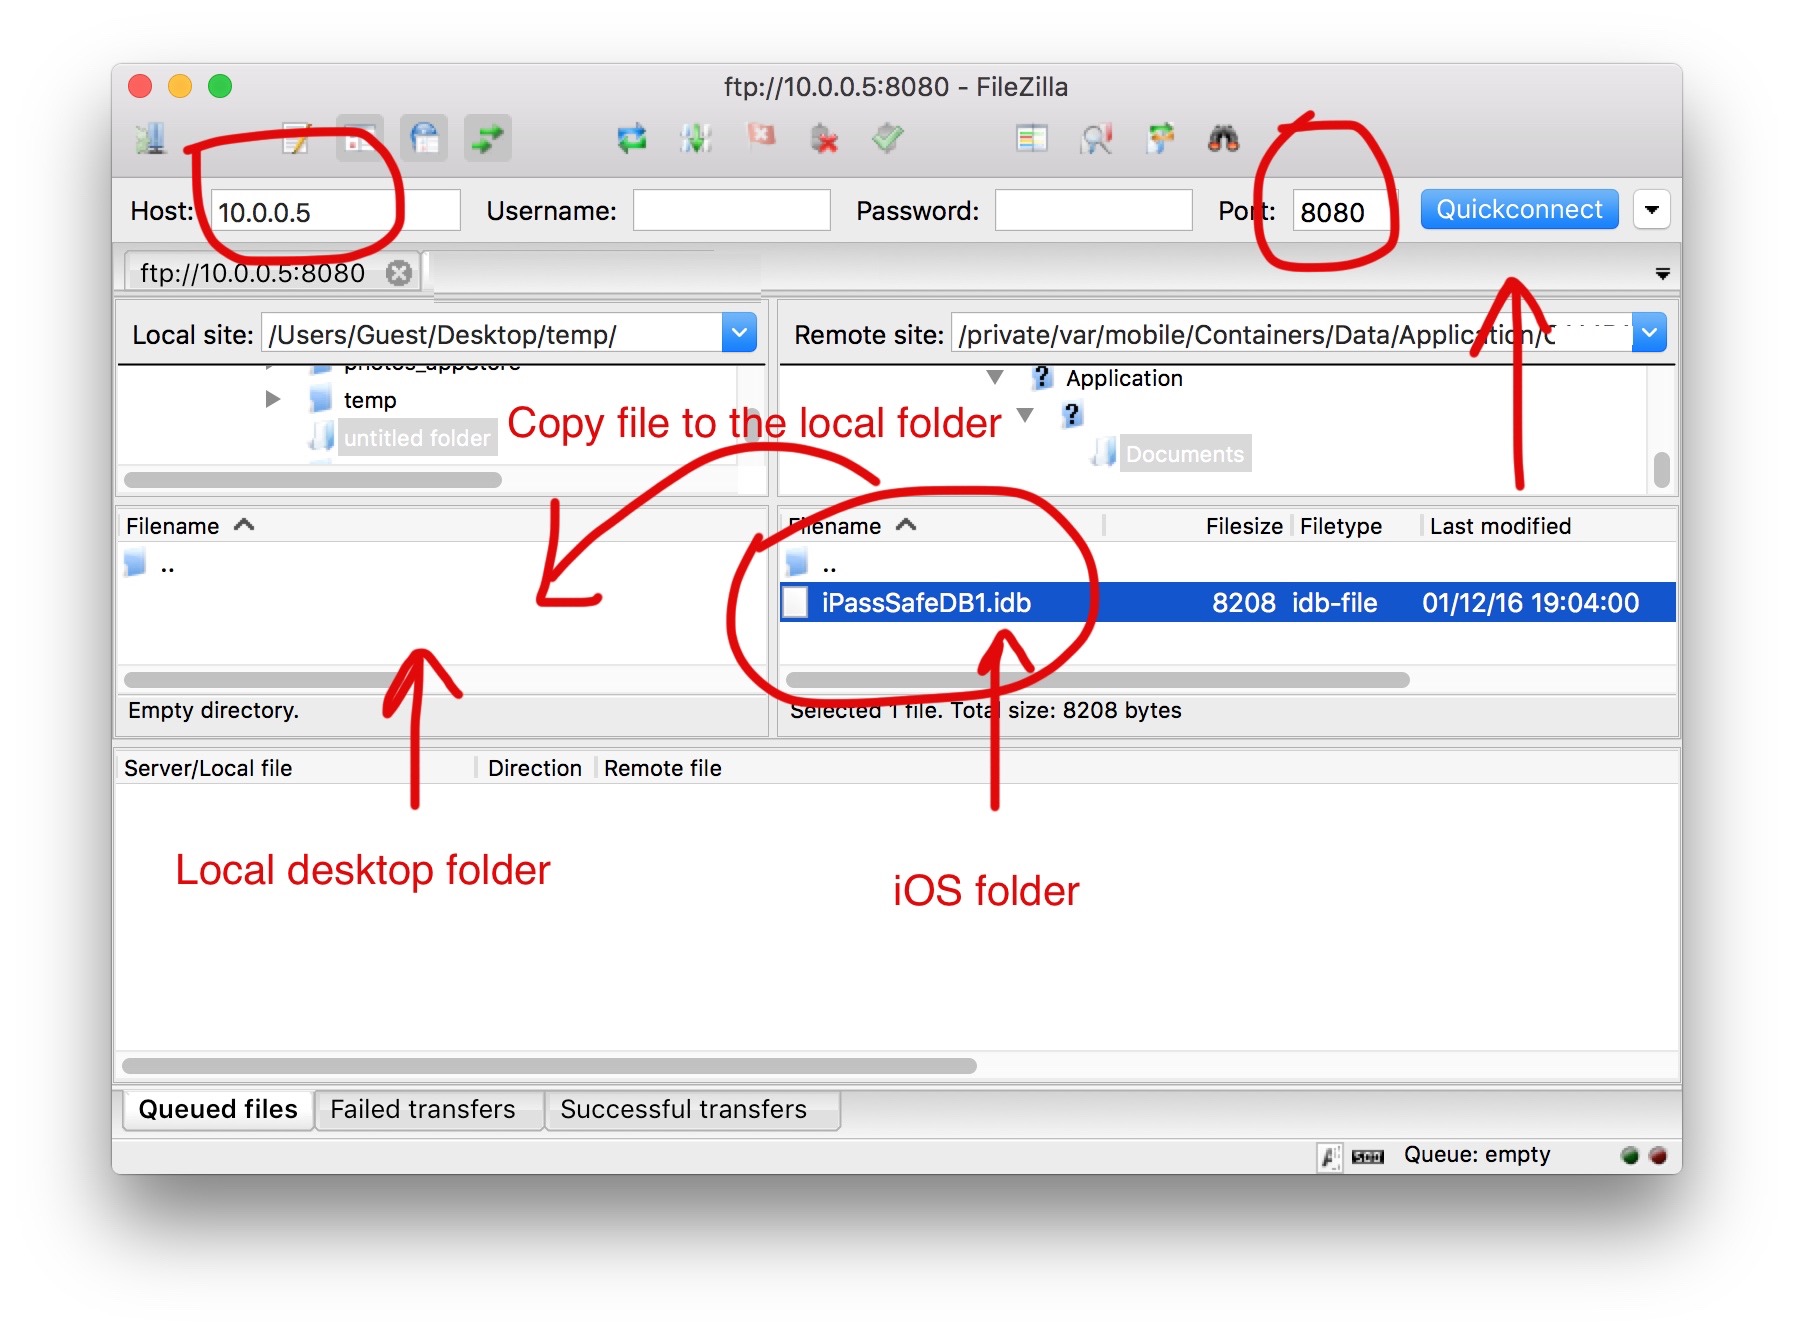
That's it !
Now keep your iDB file in safe place in case you will need to restore your data with it, you can rename the file name (for example to "backup2016.idb"), just keep the "idb" extension. -
How to copy IDB file from PC/Mac to your iOS device using FTP (iOS restore)
FTP - Environment Setup
1. Home WiFi router.
2. DeskTop (PC or Mac).
3. iOS Device running iPassSafe and connected to your home WiFi network.
4. FileZilla Client Installed on your Desktop (PC or Mac) you can get free from https://filezilla-project.org/
5. IDB backup file on your desktop for example backup.IDB (you can rename the file name)
iOS (iPod.T/iPhone/iPad) Device setup
1. Connect device to WiFi network.
2. Tap "Sync" tab on iPassSafe App.
3. Move "Activate Server" switch to "ON".
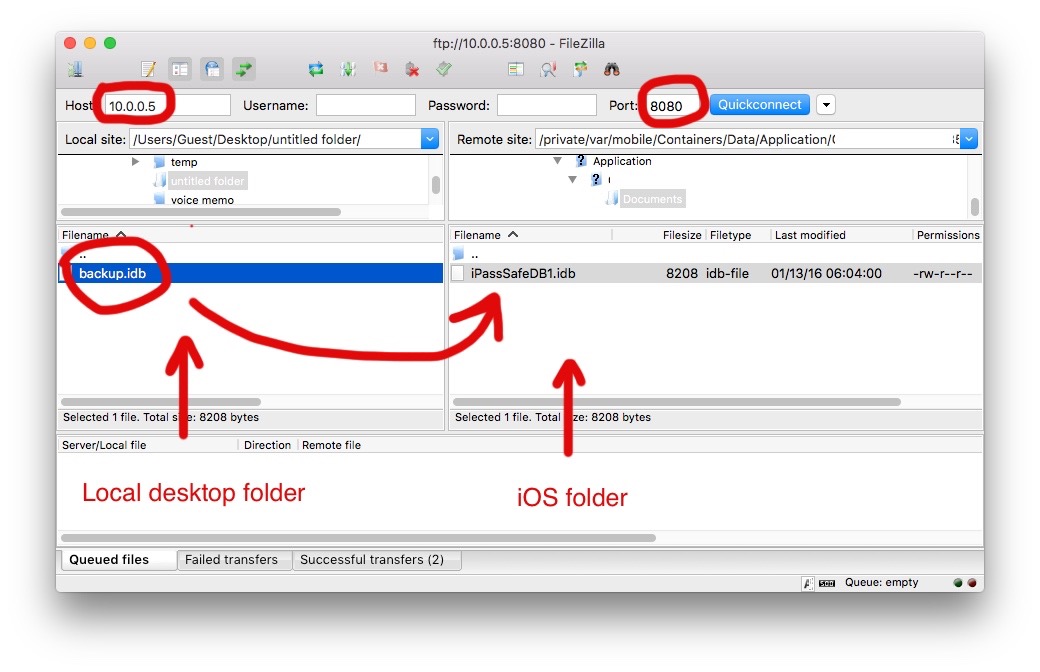
copy IDB file from Desktop to your iOS device
1. Start "FileZilla" on your desktop
2. Enter Host as iPassSafe/"Sync" WiFi address (in previous slide it's 10.0.0.5)
3. Enter port as 8080
4. Tap "QuickConnect"
5. copy iDB file using your desktop mouse from the left side (desktop) to the right side (iOS folder)
activate IDB file on your iOS device
1. refresh "sync" by tap "favorites", then "sync"
2. scroll down to "Tap Row to Select File", then tap row with "backup.idb" (you will see the checkmark on the right side after tapping)
3. tap the "i" button on the row with the text "Activate Selected file"
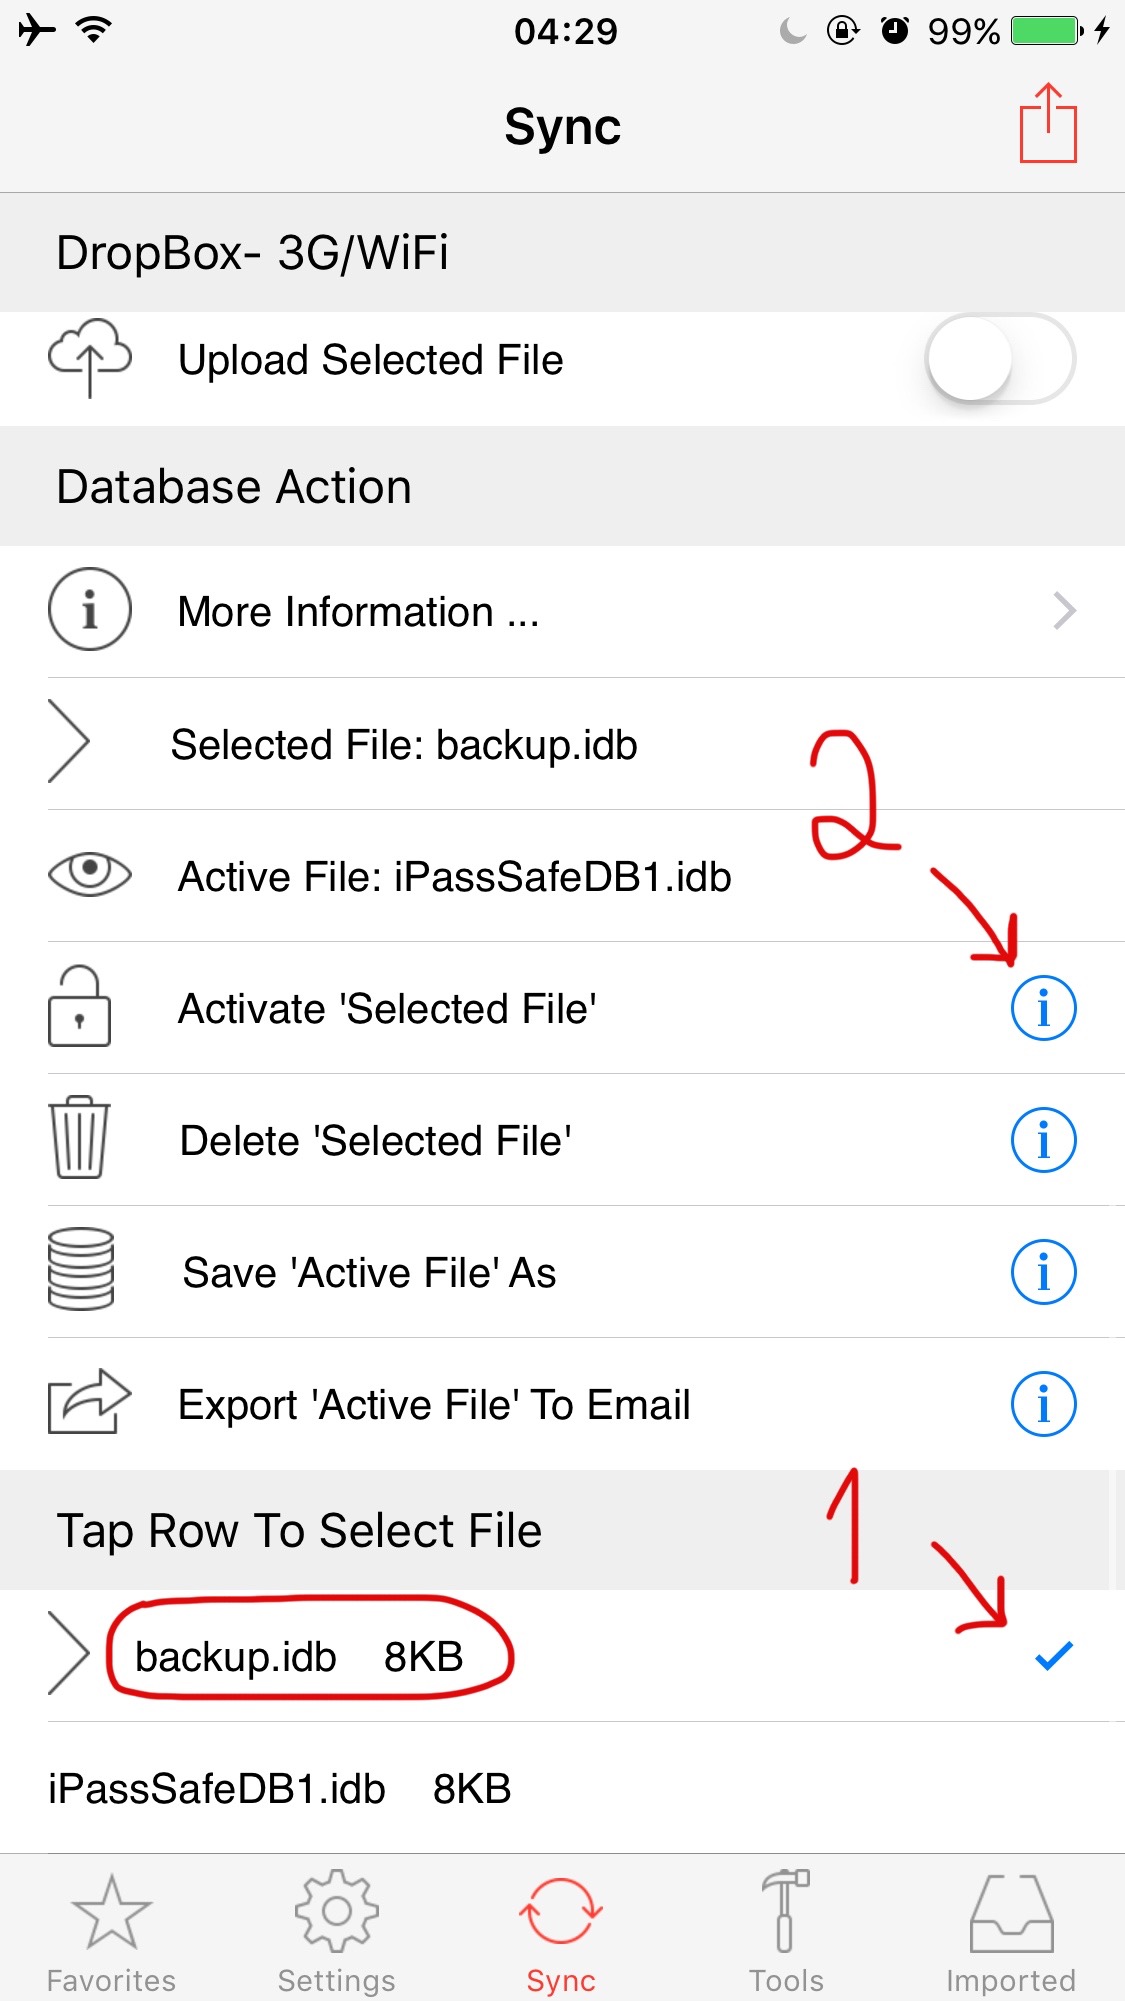
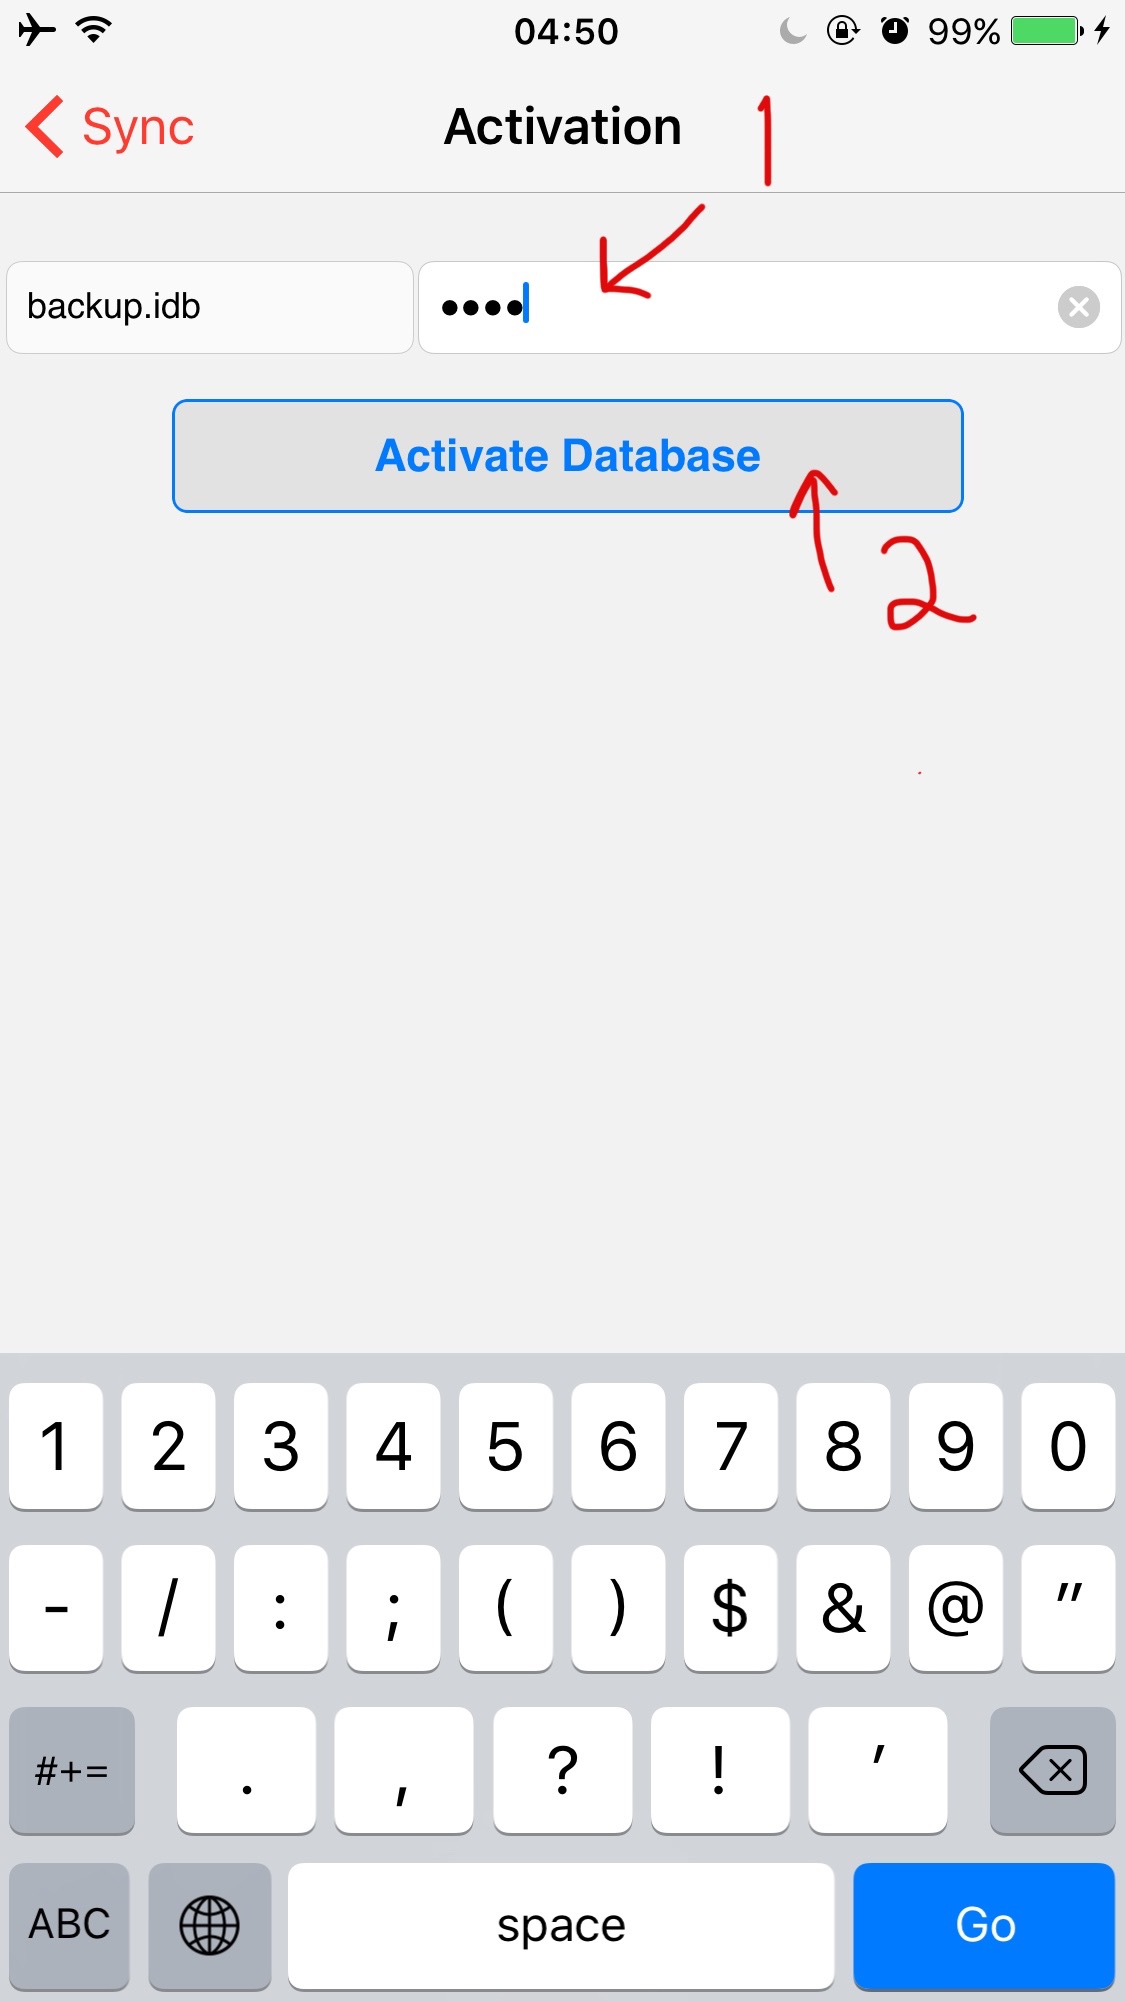
then activate the file by entering it's unlocked code (backup.idb unlock code), and tap the "Activate Database" button
-
How to copy information from one iOS device to second iOS device using AirDrop ?
It's very fast & easy to do, please note that all information from the first device will replace (overwrite) the information on the second device (not merge), also you should do it using your home WiFi.
In the following example, we will show how to copy information from iPod touch to iPhone, but you can use the same example for iPhone to iPad or any iOS device to iOS device.
1. Enable AirDrop on both iOS devices.
Steps on the source device (in this example it's the iPod touch):
2. Using the source device iPassSafe App, the device with the data (in this example it's the iPod touch), please tap "sync" bottom tab, then tap upper right "action button"
3. Select the destination device (in this example it's the iPhone) you want to copy data to, in the AirDrop section
Note: in case that the share popup is not open, please install free Dropbox app (don't need to use it, just to install).
Steps on destination device (in this example it's the iPhone):
4. unlock iPassSafe app and tap "imported" tab, then tap the row with the IDB file
Next, tap the "i" button on the row with the text "save & activate file"
then activate the file by entering it's unlocked code (iPod touch unlock code), and tap the "Activate Database" button
That's it! -
How to upload backup IDB file(s) from iOS device to Dropbox ?
Note: Before you start to upload IDB file(s), please download Dropbox free app from the App Store
1. unlock iPassSafe, tap "sync" tab, and link iPassSafe to Dropbox by moving "Link to Dropbox" switch to "ON" (you will need to confirm "iPassSafe" access to your Dropbox account).
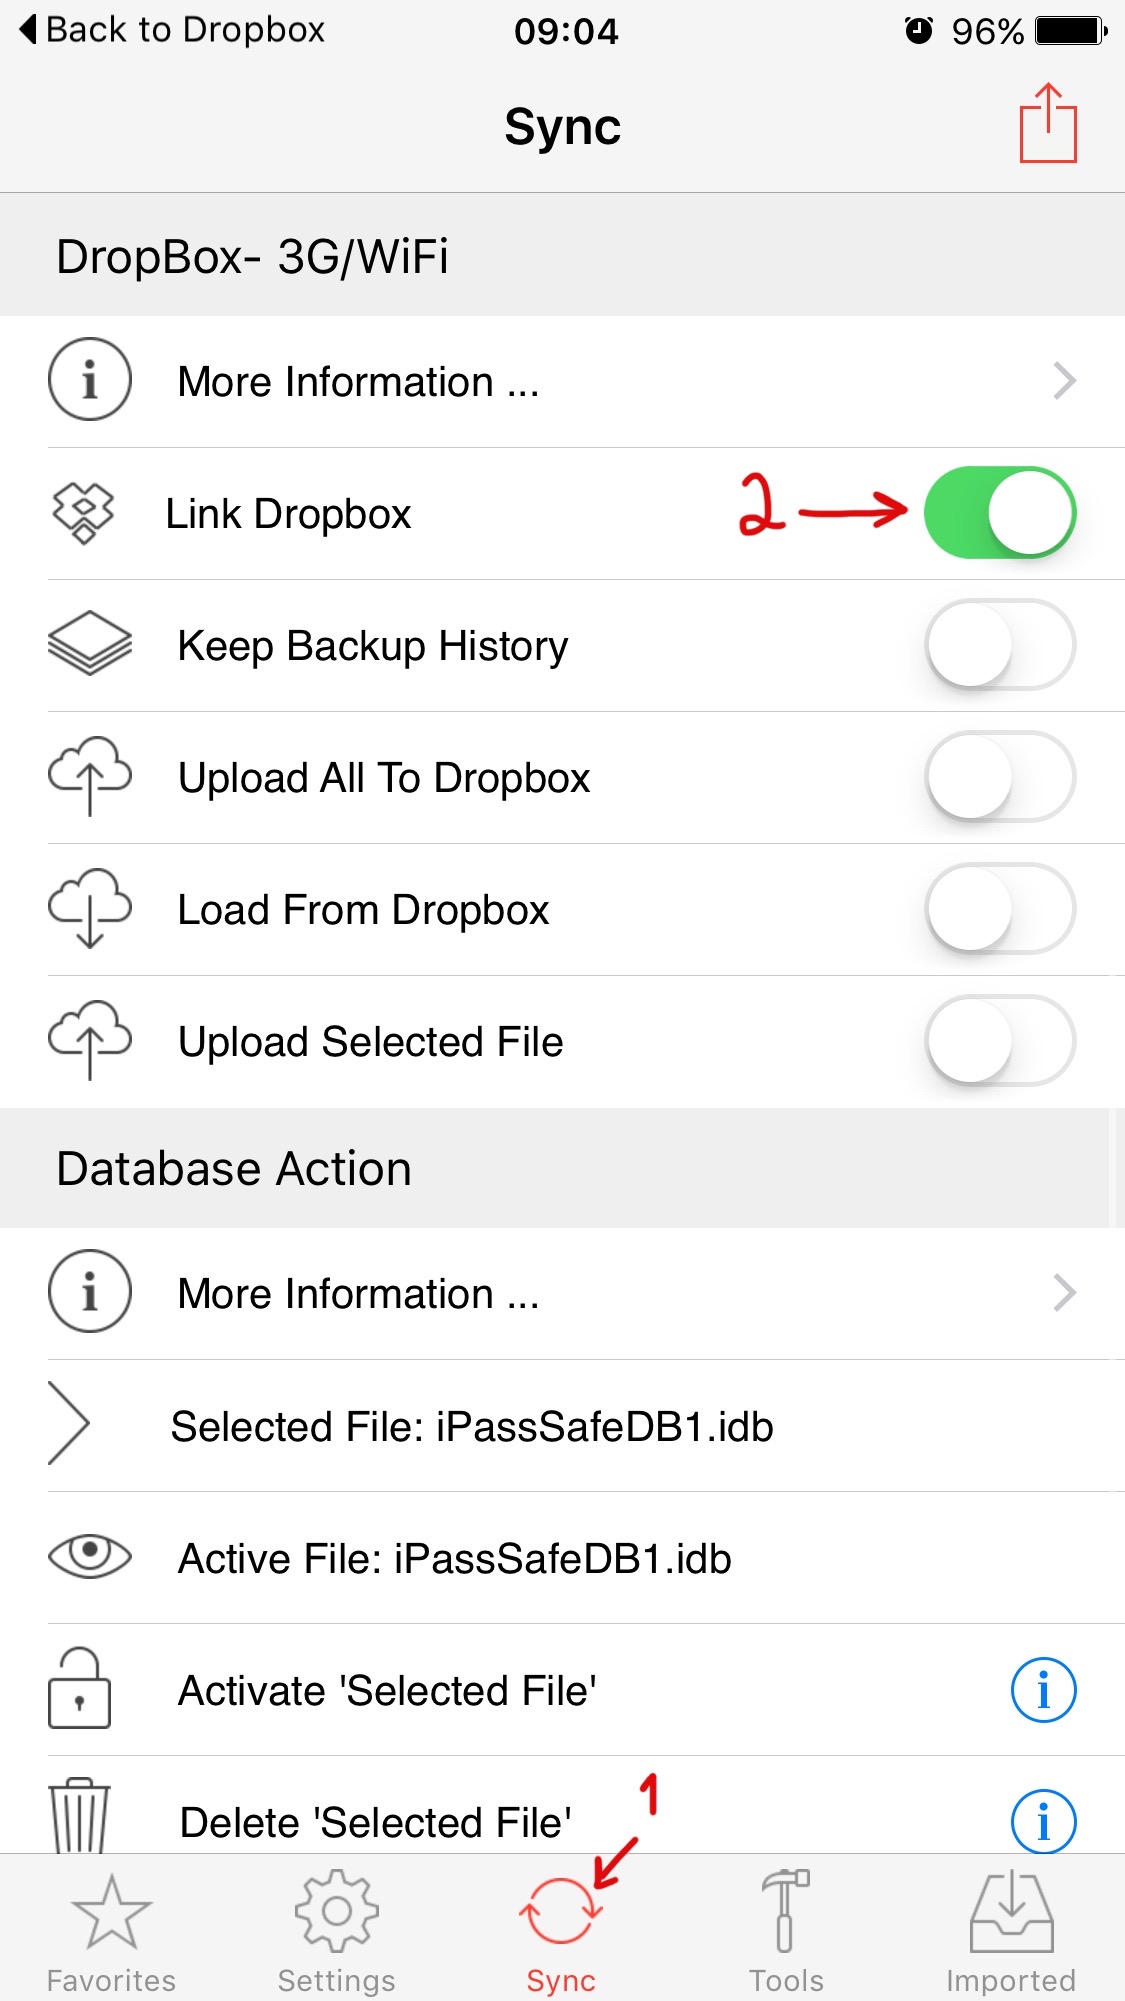
2. To upload your IDB file(s) to your Dropbox cloud account, move "upload All To Dropbox" switch to "ON".
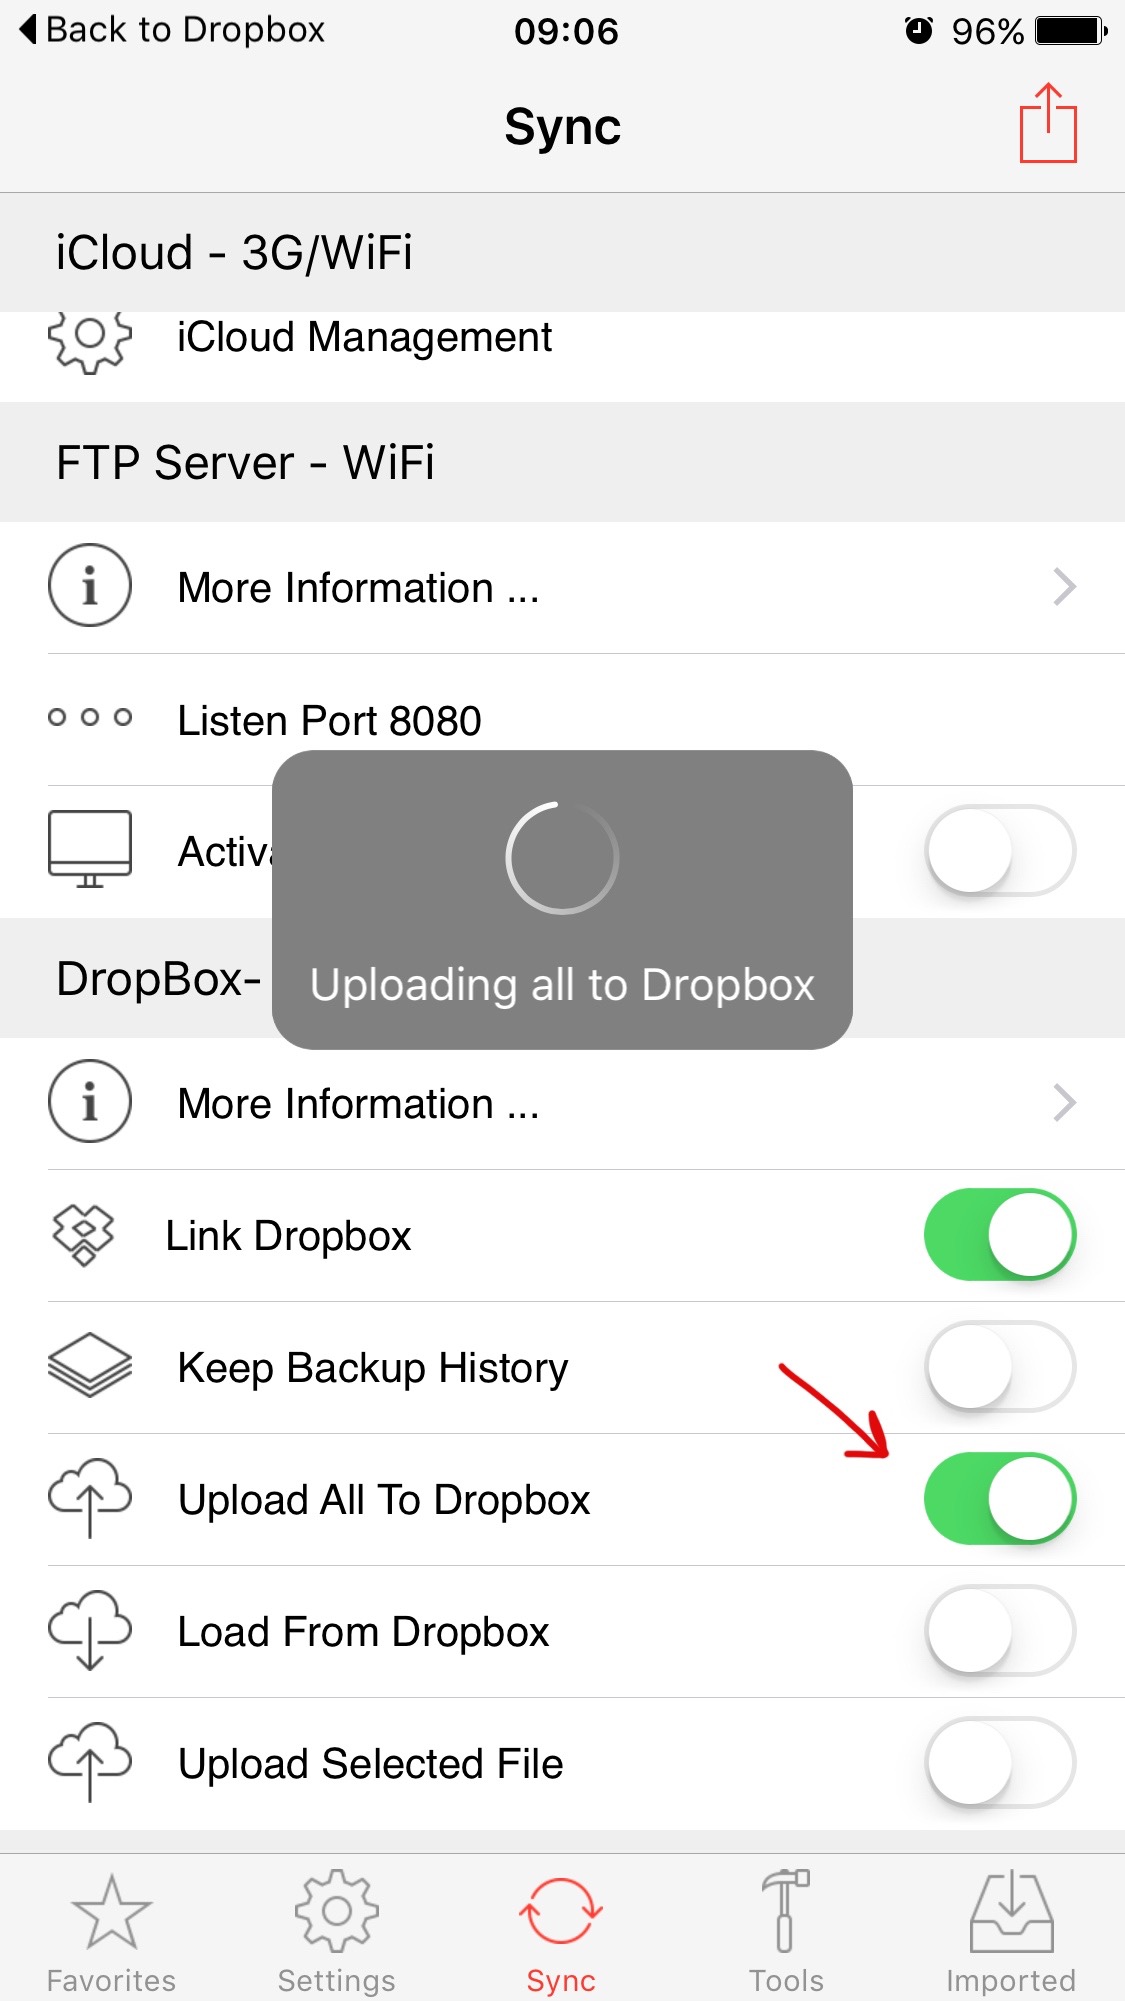
That's it !,
This will create "iPassSafe" folder in your Dropbox root, with your uploaded file(s). -
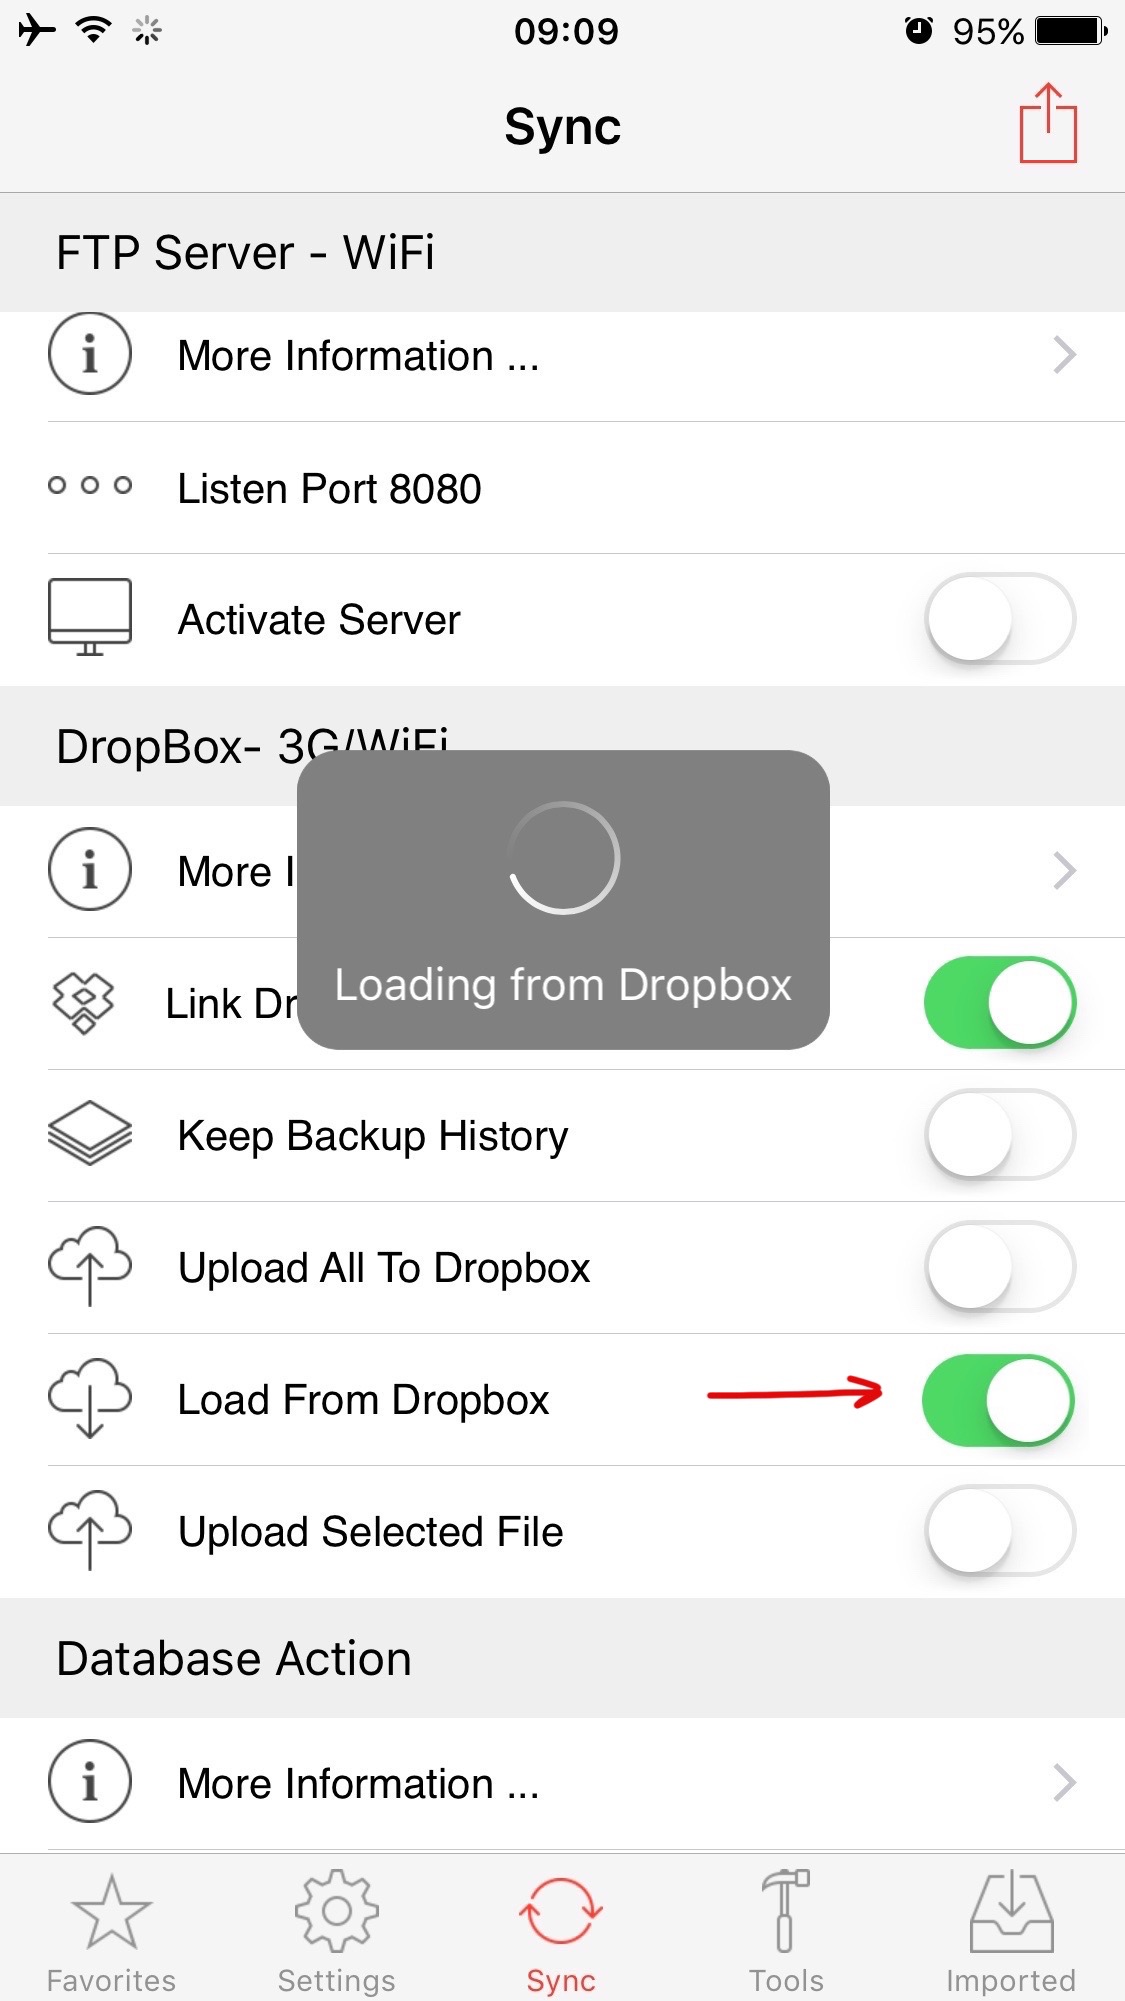
How to load backup IDB file(s) from Dropbox to iOS device?
Note: Before you start to load IDB file(s) from Dropbox, please download Dropbox free app from the App Store
Loading from dropbox to iOS steps:
1. unlock iPassSafe, tap "sync" tab, and link iPassSafe to Dropbox by moving "Link to Dropbox" switch to "ON" (you will need to confirm "iPassSafe" access to your Dropbox account).
2. To load your IDB file(s) from your Dropbox iPassSafe folder, move "load from Dropbox" switch to "ON".
Activate (unlock) loaded file to see it's data:
3. To activate loaded IDB file, scroll all the way down to the section header "Tap Row To Select File", and tap the row with the file name you want to activate (see the checkmark on its right side), then tap the "i" on the row with the text "Activate selected file"
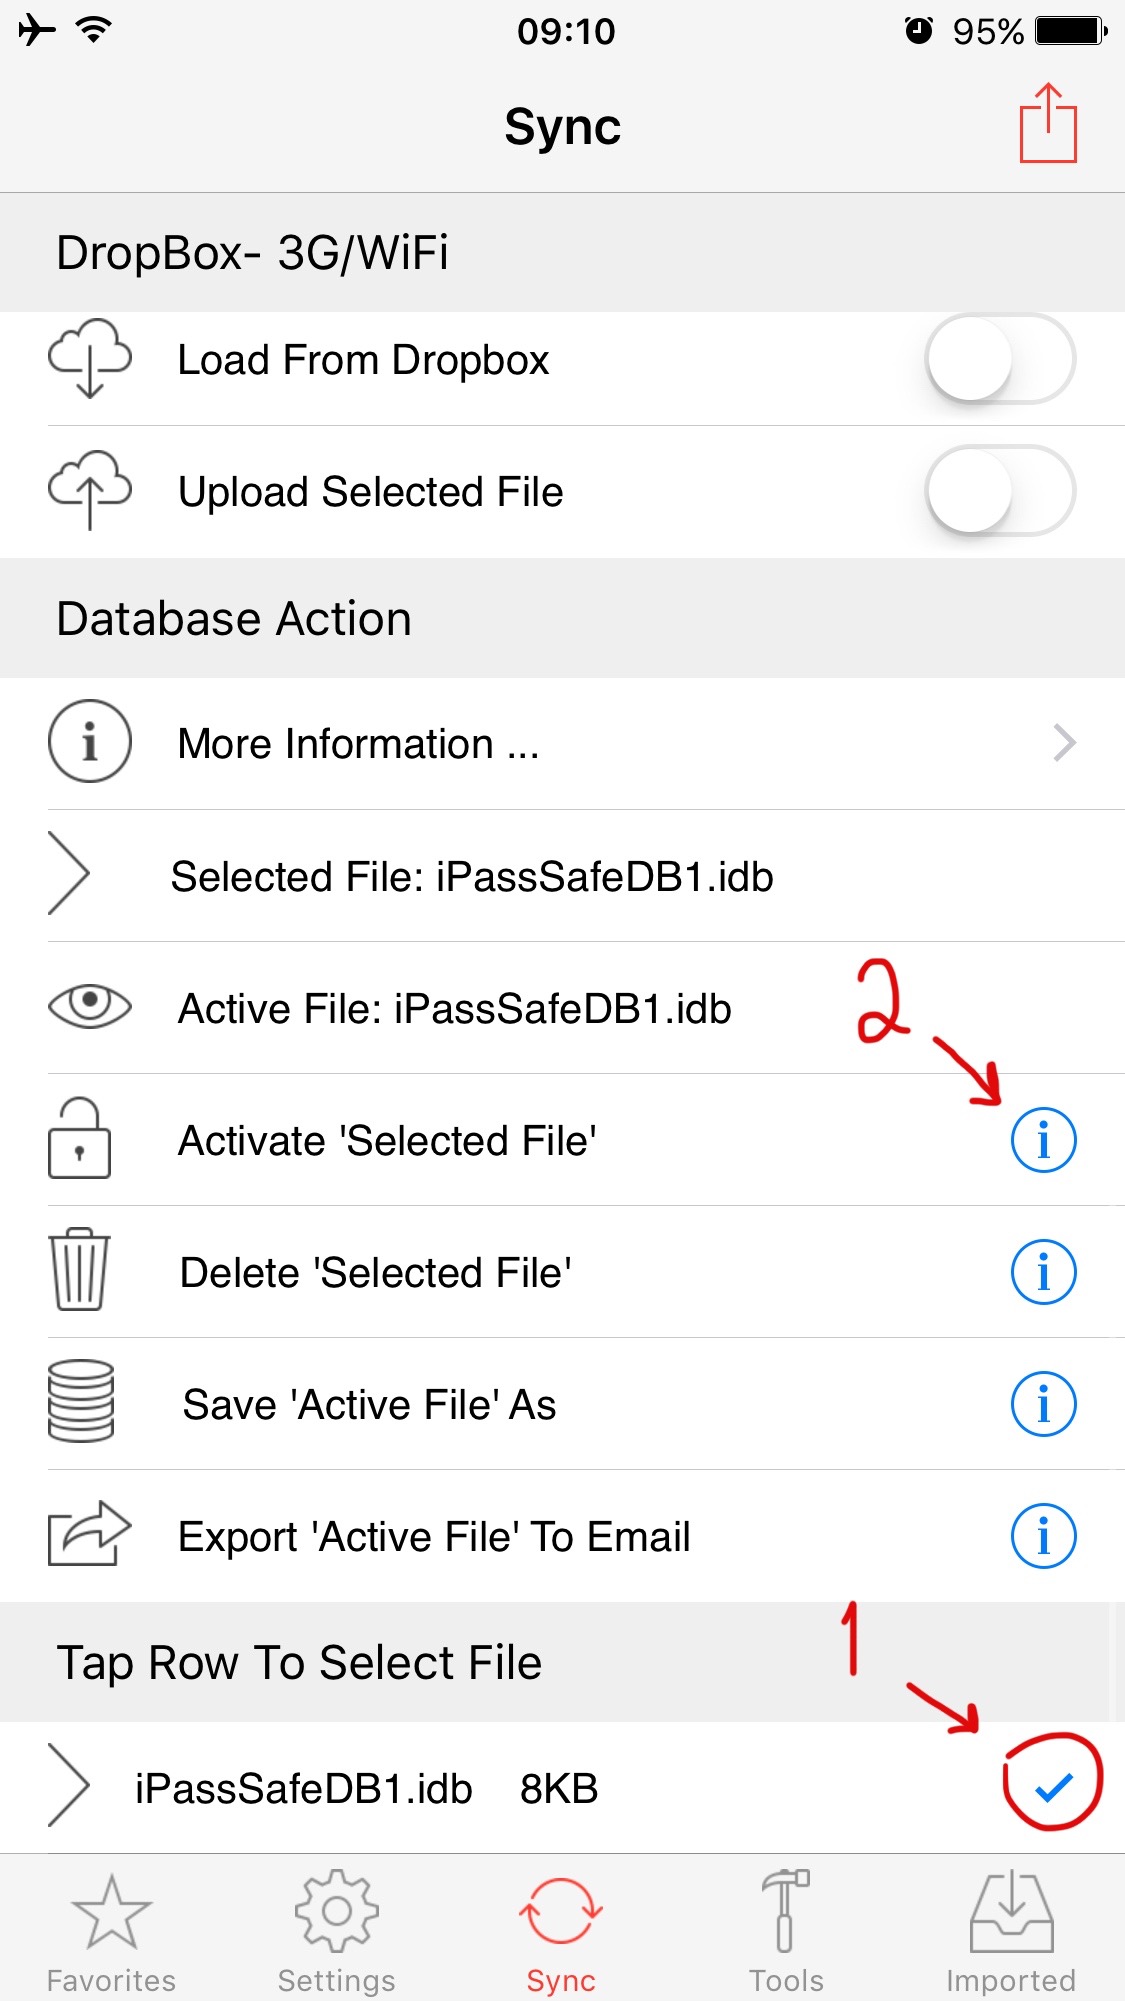
then activate the file by entering it's unlocked code (the file's unlock code), and tap the "Activate Database" button
That's it! -
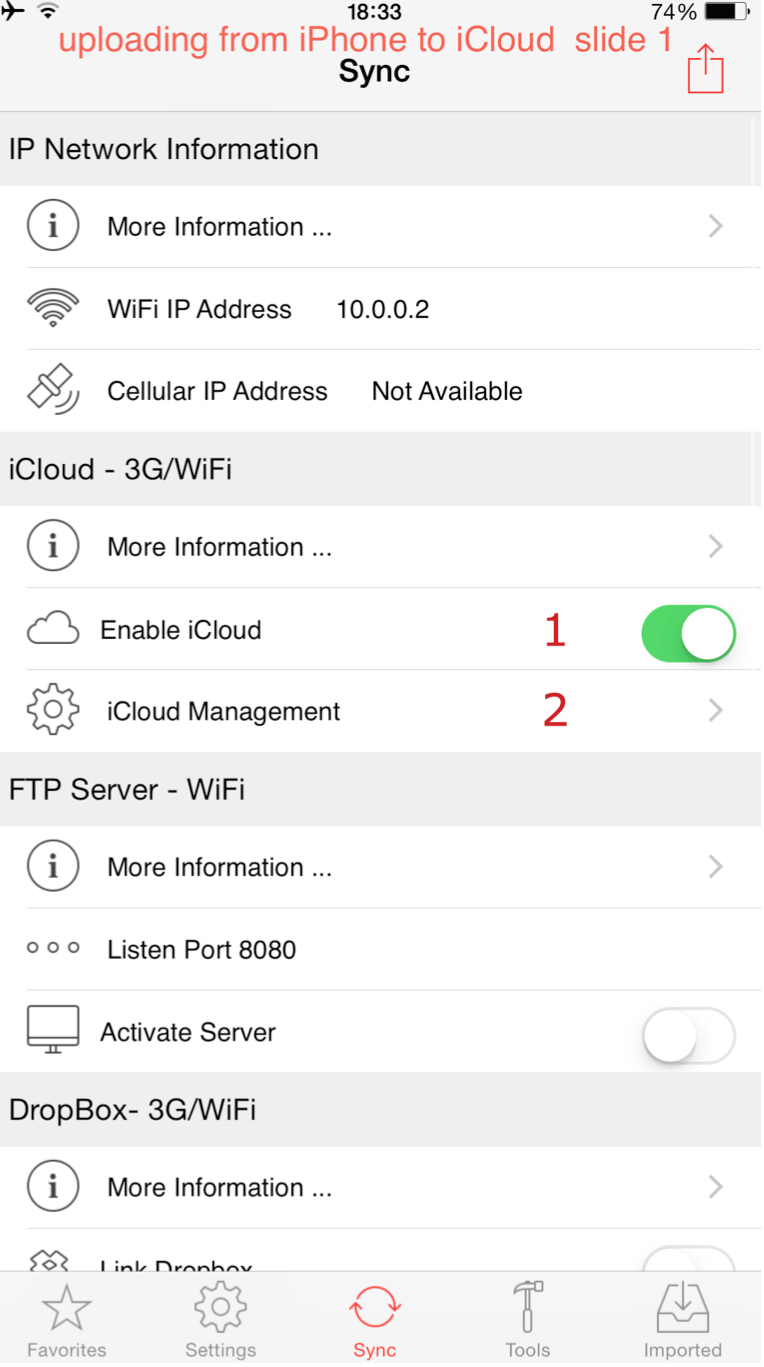
Copy iPhone/iPad iPassSafe's Data to your iCloud
1. Unlock iPassSafe, tap "sync" tab, and move "Enable iCloud" switch to "ON" (1),
then tap iCloud Management" (2)
2. Tap "Upload Active File To iCloud" (3) , and confirm (4).
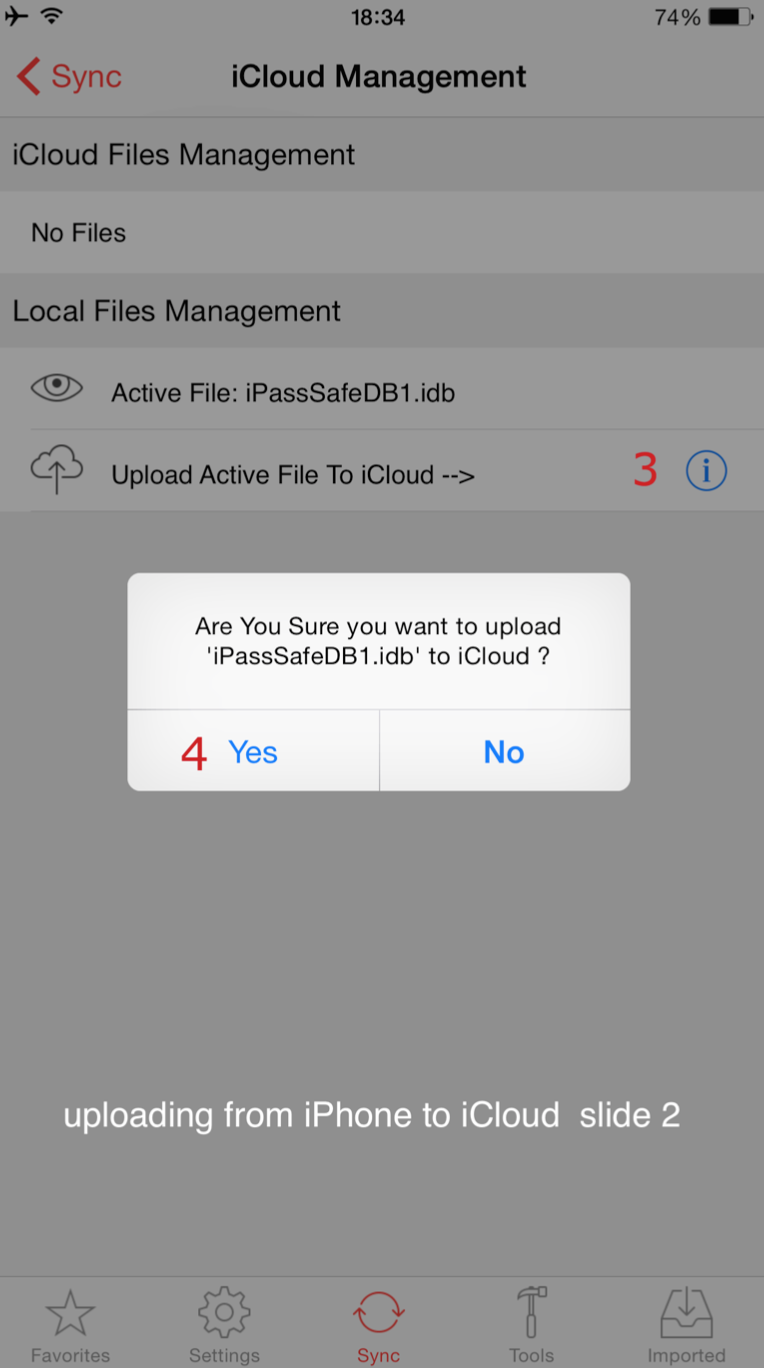
That's it !
-
Copy Data from iCloud to OSX (see data on Mac App)
1. Launch iPassSafe for macOS
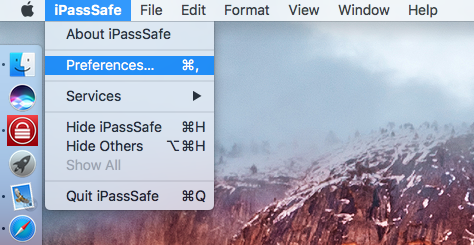
2. From menu bar select iPassSafe > Preferences
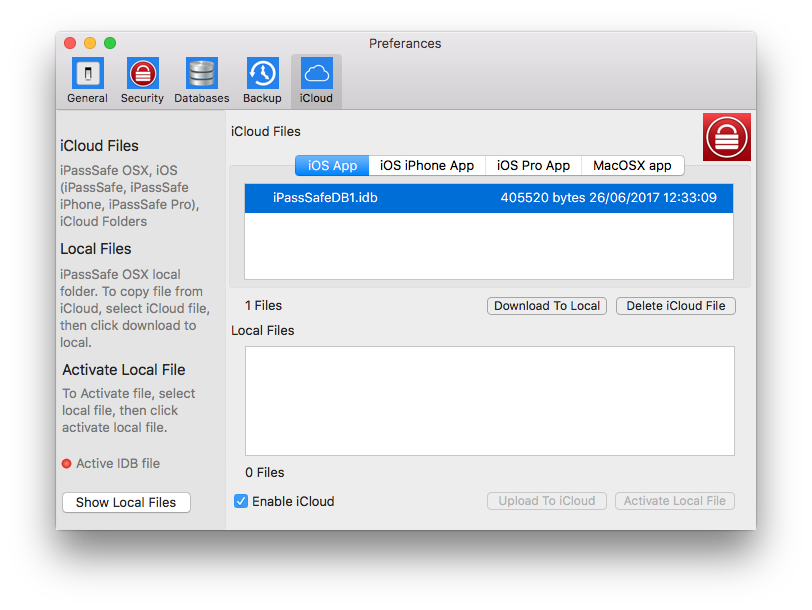
3. Tap "iCloud" tab, then select the iCloud folder you want to download from:
- iOS App (Free iPassSafe for iOS),
- iOS iPhone App,
- iOS Pro App
Next please select the file you want to download (i.e iPassSafeDB1.idb), and tap "Download To Local"
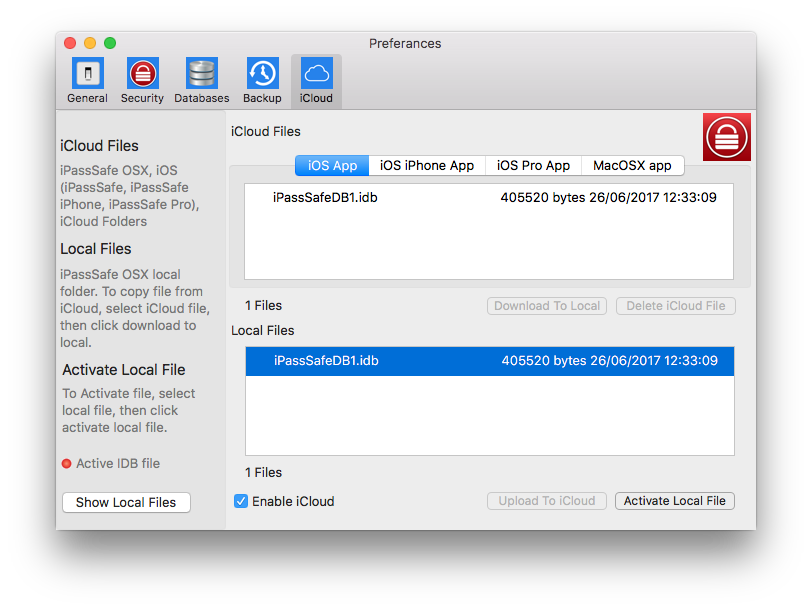
4. To Activate file (unlock), tap "Activate Local File", and provide it's unlocked code.
That's it -
iPhone to iPad using iCloud (Example)
How to copy (overwrite) all information from iPhone to iPad/
Note: This is OVERWRITE process, Don't do this if you have information you need ONLY on iPad (and not also on the iPhone)
Air Print
-
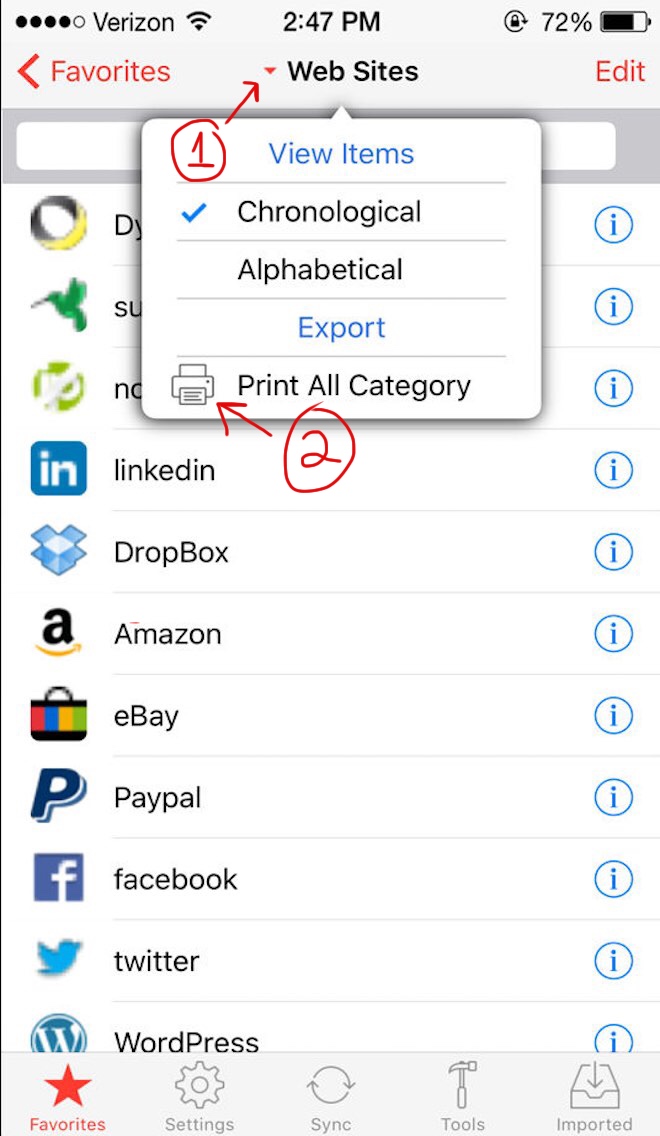
How do I print ALL category ?
Inside category (websites, credit cards ...), tap its title (1), then tap "Print All Category" (2).
Customized Category
-
How to add a new custom category to favorites?
The first step is to show the custom category in 'favorites' tab
steps:
1. Tap "Settings" tab, then tap "Select Favorites".
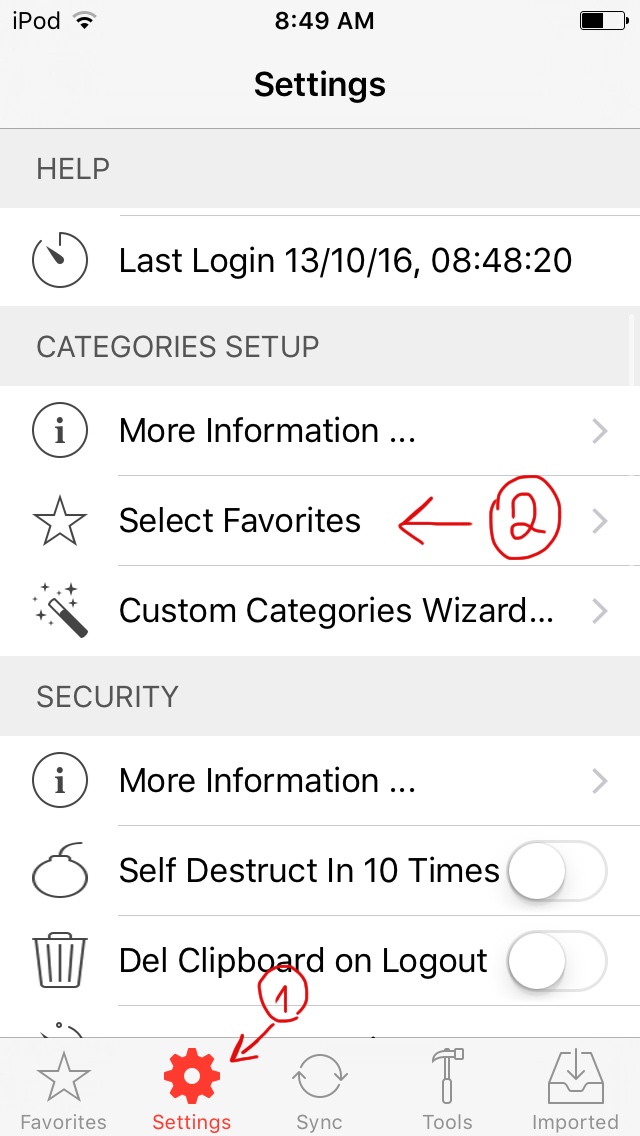
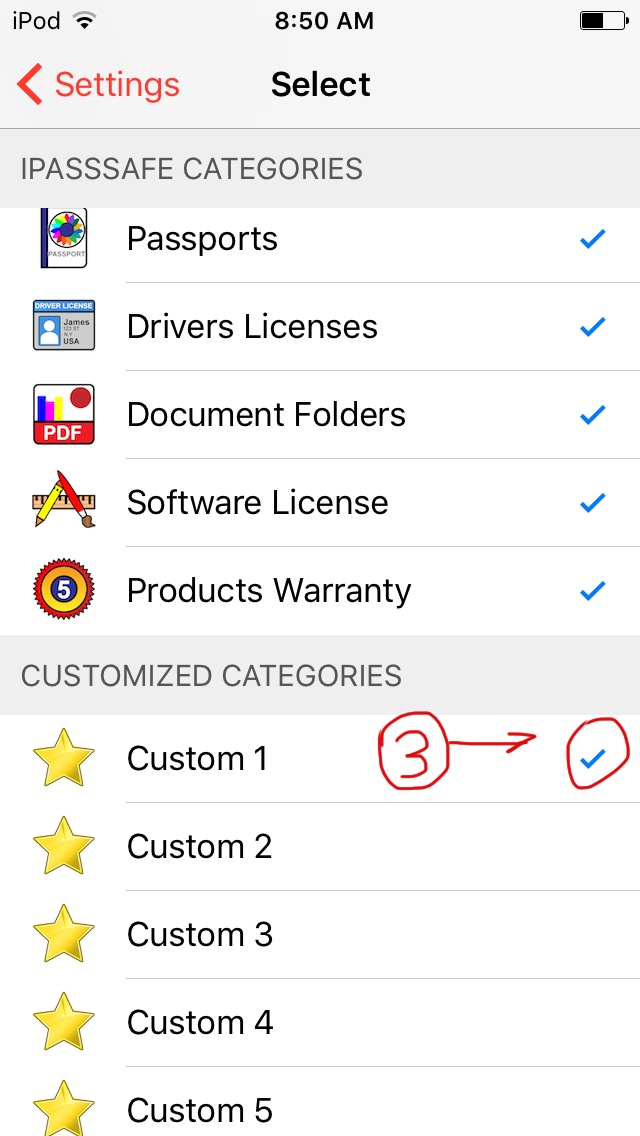
2. Scroll Down to "CUSTOMIZED CATEGORIES" and check (v) custom category (i.e "Custom 1").
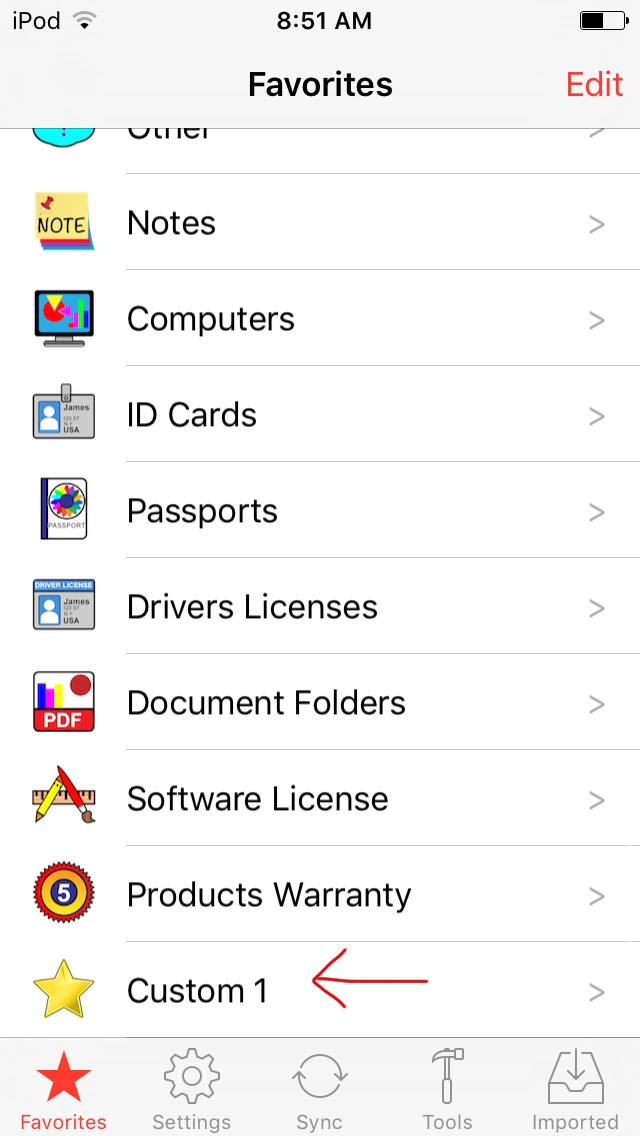
3. Verify that you see it on Favorites Tab
The second step is to design your category
steps:
1. Tap "Settings" tab, then tap "Custom Categories Wizard".
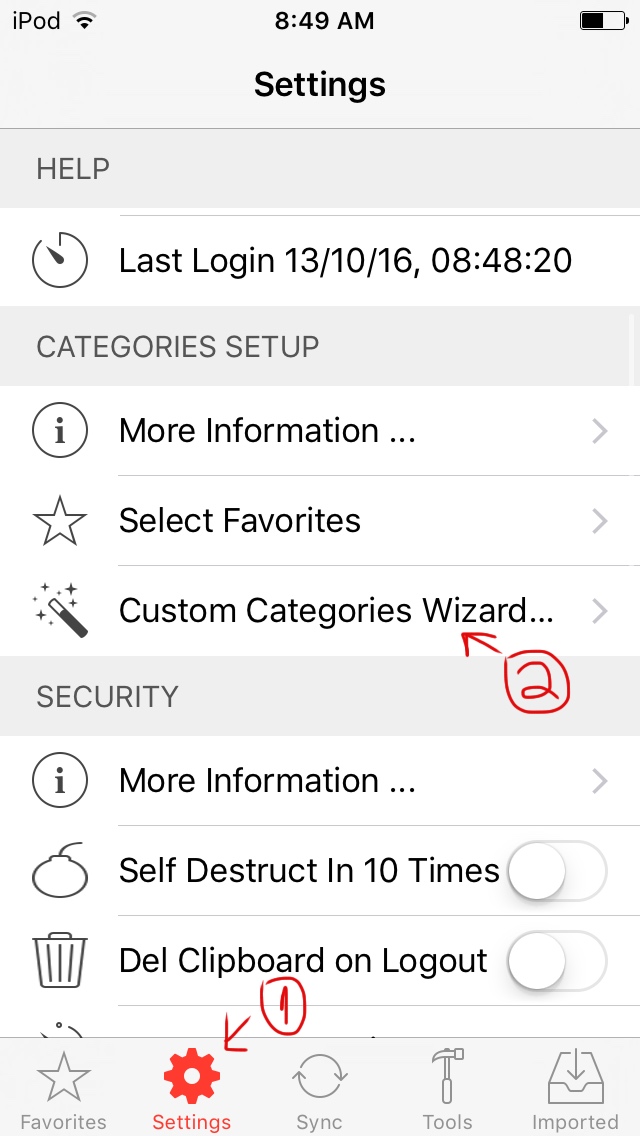
2. Tap your custom category (i.e "Custom 1").
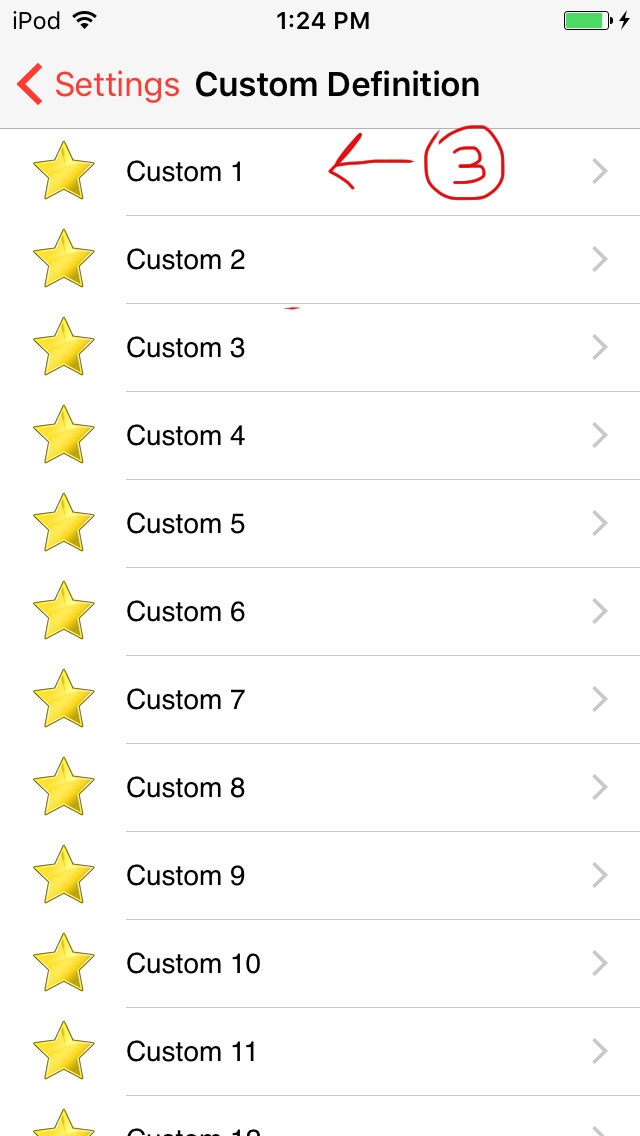
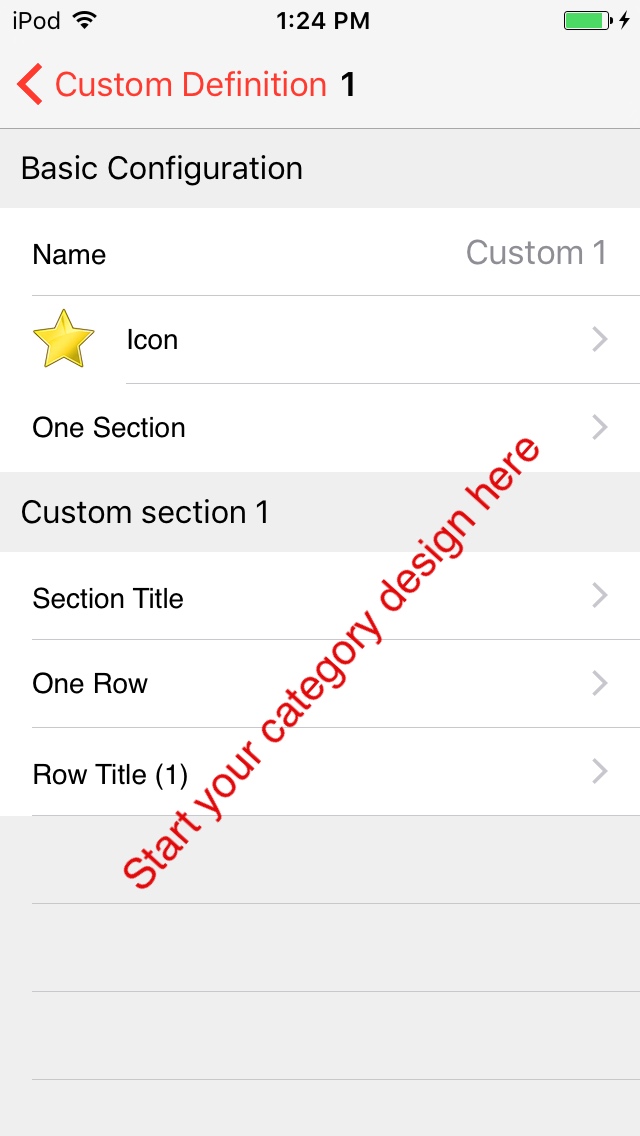
3. Design your category (Name, Icon, Sections, Rows...)
iPassSafe for Mac OSX
-
Mac App Store version

-
How can I use iPassSafe for Mac to fill login in Safari?
1. Launch iPassSafe for macOS
2. From Mac menu bar select iPassSafe > General, "Enable Safari Extension"
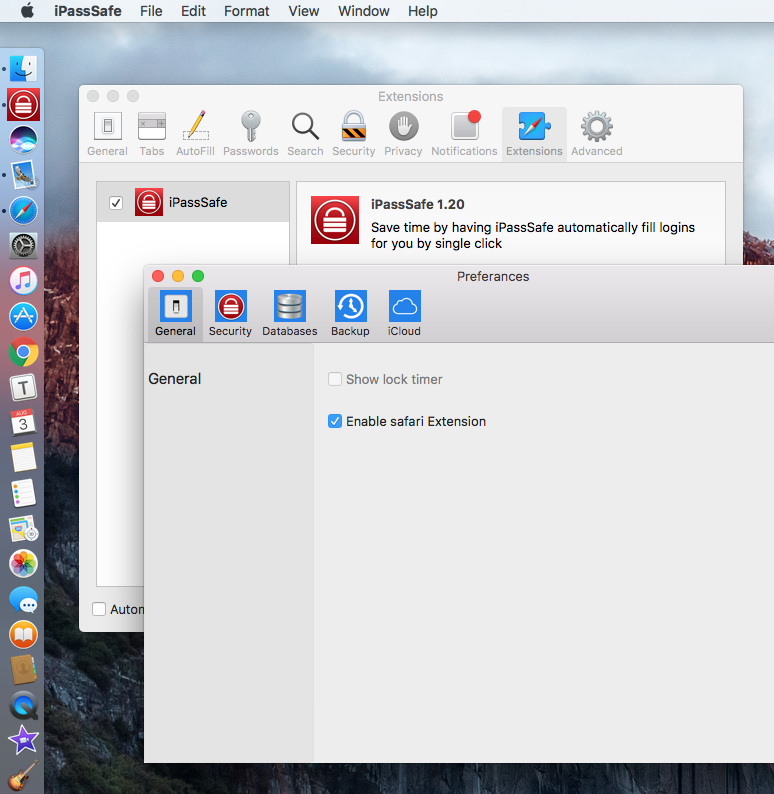
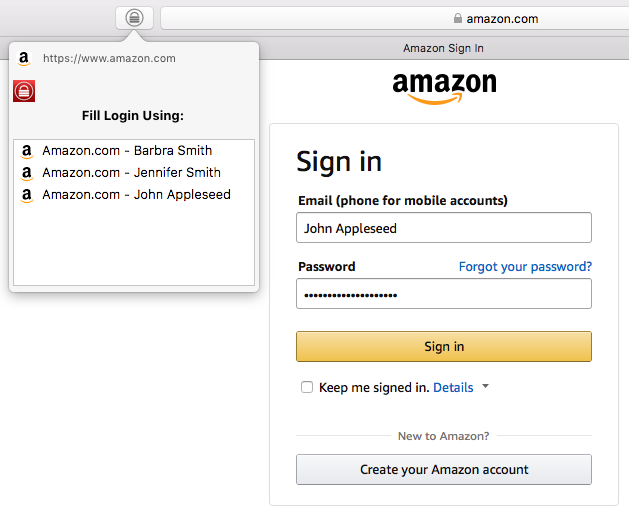
3. Use iPassSafe Tool Bar icon in Safari app to fill login
Note: During install or update iPassSafe version from Mac Store, you will need to close Safari App.
-
Copy Data from iCloud to OSX (see data on Mac App)
1. Launch iPassSafe for macOS
2. From menu bar select iPassSafe > Preferences
3. Tap "iCloud" tab, then select the iCloud folder you want to download from:
- iOS App (Free iPassSafe for iOS),
- iOS iPhone App,
- iOS Pro App
Next please select the file you want to download (i.e iPassSafeDB1.idb), and tap "Download To Local"
4. To Activate file (unlock), tap "Activate Local File", and provide it's unlocked code.
That's it
Other Platforms
-
iPassSafe for Windows & Android
We are working on iPassSafe for windows and Android Platforms.
When ready, it will be available for download only via official Google Play & Microsoft App store, stay tuned!.
Troubleshoot
-
I tried to enter unlock code "0000" first time I used iPassSafe (didn't enter data yet), but it is not logging me in?
Please delete the iPassSafe application from your device and install it from App Store again (it will be free of pay), after that try again to unlock with "0000".
-
I can't load/upload from/to Dropbox
Please check the following:
1. Network connectivity, please check WiFi or 3G works good (try to open safari URL, or change network (3G/WiFi) ...)
2. Launch "Dropbox" app see if it is working can you and if you can browse your files with it
3. Check if you have enough space on you iOS device using "Settings" app -> "General" -> "About" -> "Available"
4. Check that you are using the latest Dropbox app -
I have been asked to pay again for an upgrade
it's impossible to pay twice for the iPassSafe app or upgrade, as long as you are using the SAME Apple ID which you purchased with.
Please go to "settings" -> "buy Options" and tap "restore purchase". -
Touch ID is not working
(1) Make sure that your device supports touch ID, and is set with unlock code.
(2) Go to "settings" tab and verify that "touch ID" is set to "ON".
(3) Restart iPassSafe by Double clicking on "home" button, and remove it from the list of background running apps, then click on iPassSafe again to see touch ID popup.
Support
- Support